Easy-ngrok for EvoControl
Because ![]() Domoticz and
Domoticz and ![]() Home Assistant (HA) are not natively
accessible from outside your LAN, we need to install a so-called proxy to
enable secure access to your instance from the Amazon cloud.
Home Assistant (HA) are not natively
accessible from outside your LAN, we need to install a so-called proxy to
enable secure access to your instance from the Amazon cloud.
Our easy-setup procedure deploys a proxy called ngrok to open up a persistent tunnel resulting in a password-protected URL like https://a81e-77-248-62-27.eu.ngrok.io for your Domoticz/HA instance.
Since initializing the tunnel is an outward process originating in your LAN, there's no need to open any ports in your router — ngrok also takes care of a valid certificate for SSL.
Alexa ↔ [443/https] ↔ proxy ↔ [8080/8123/http] ↔ Domoticz/HA
The skill communicates with your proxy and it is the proxy (perched on the LAN side of your firewall on your local network at home) that actually interacts with Domoticz/HA.
With this approach, cloud control is password-protected while local control within your LAN remains completely unrestricted.
Visit the ngrok.com website (no affiliation) for an explanation of how it works and what plans are available. The free plan[1] works just fine for our purposes so go ahead and Sign Up.
To subsequently authenticate you towards ngrok, you should make a note of your personal authtoken which resides at https://dashboard.ngrok.com/auth/your-authtoken. It will look something like 4nq9771bPxe8ctg7LKr_2ClH7Y15Zqe4bWLWF9p.
Please ignore any download/setup instructions at the ngrok website as they are geared towards setting up access to a web-server on 80 rather than a home automation server on 8080 (Domoticz) or 8123 (Home Assistant). Our installer will automatically download ngrok for you and configure it for Domoticz/HA.
[1] The easy-setup installer ensures that the skill is updated with the changed tunnel URL whenever you restart ngrok or reboot your machine.
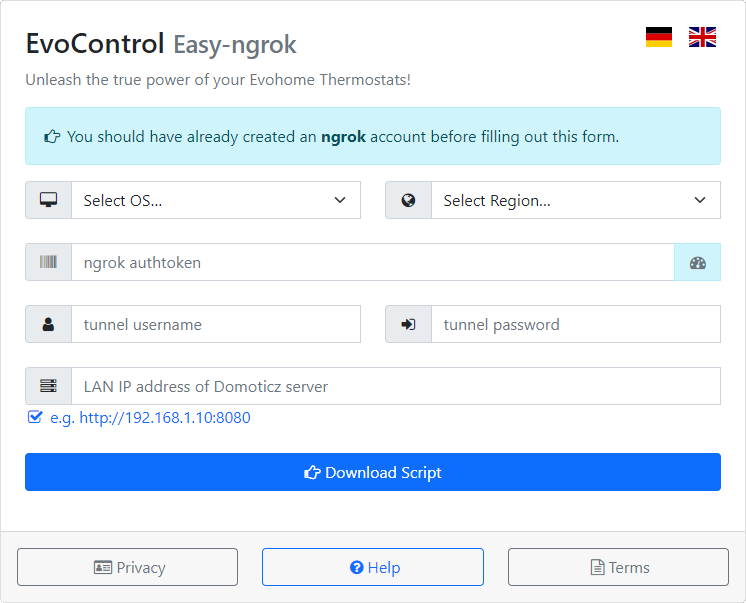
You must provide the following 6 pieces of information:
- The target operating system under which ngrok will run. If you cannot remember if your Linux distro is 32-bit or 64-bit, the result of uname -mpi will enlighten you. For example, ARMv7 is 32-bit while ARMv8 is 64.
- Region. To minimize latency, ngrok will use a cloud server physically near you. You can choose one of eu us ap au sa jp in.
- Authtoken. Paste the personal authtoken you copied after ngrok SignUp (e.g. 4nq9771bPxe8ctg7LKr_2ClH7Y15Zqe4bWLWF9p) or else use the light-blue -icon button to visit your ngrok account and retrieve it.
- A username to associate with your tunnel to prevent unauthorized cloud-access to Domoticz/HA. Min. 8 chars, no spaces. Valid: A-Z a-z 0-9 .@!#$%&*+-=?^_~
- A password to associate with your tunnel to prevent unauthorized cloud-access to Domoticz/HA. Min. 8 chars — at least 1x A-Z, 1x a-z, 1x 0-9, 1x @#$%^&+=_-.*
- The local fixed IP address used to access Domoticz/HA inside your LAN. For example, http://192.168.1.10:8080. You may omit the http prefix but not the 8080.
When all the entries are completed, press the large blue Download Script button and the script file will be saved by your browser.
Your browser may warn that files sourced from the internet are potentially harmful — it does this based on the .sh or .ps1 file extension, not the actual contents. Some browsers or virus-scanners may even change the extension of the saved file to .txt to render it 'harmless'. If that happens you will need to manually rename with the correct extension before running it.
Follow the appropriate instructions below for the OS under which ngrok will run:
Debian Linuxes
Applies to any Debian-based distro which supports systemd services and
bash scripting. Examples include Raspberry Pi OS, Ubuntu and Debian.
- Open a terminal. Place[1] the downloaded file ecsetup.sh in your home directory, e.g. /home/pi
- Run it using sudo bash ecsetup.sh
If your target machine is a pi there's one more important step to ensure the OS waits for the network to come up at boot time. Issue the command sudo raspi-config. Choose System Options and then S6 Network at Boot and choose <Yes>.
If something does not work and you are wondering if your fetched ngrok binary is the correct version for your architecture, type which ngrok and then use the file command on the result, e.g. file /usr/local/bin/ngrok. The output will include something like ELF 64-bit LSB executable, x86-64 or ELF 64-bit LSB executable, ARM aarch64.
Installs ngrok to /usr/local/bin/ngrok and creates a service file /etc/systemd/system/ngrok.service to run ngrok as a daemon at boot. It also builds a file called ~/.ngrok2/ngrok.yml with your configuration. Finally, it creates the ~/ngrok_updater.sh auto-updater file that refreshes your tunnel details when you reboot.
MacOS
Place the downloaded ecsetup.sh script in your normal Downloadsfolder.
- In the Finder, open the Applications folder and then Utilities. Double-click on Terminal to pop open a terminal.
- Inside the terminal window, typecd ~/Downloads
- Run the installer using sudo /bin/bash ecsetup.sh (you will need to type your Mac password to authorize).
Installs ngrok to /usr/local/bin/ngrok and creates a launchd file /Library/LaunchDaemons/com.ngrok.onstartup.plist to run ngrok as a daemon at boot. It also builds a file called /usr/local/bin/.ngrok2/ngrok.yml with your configuration. Finally, it creates the /usr/local/bin/ngrok_updater.sh auto-updater file that refreshes your tunnel details when you reboot.
Windows 10 / 11
- Right-click on the downloaded PowerShell file ecsetup.ps1 in your downloads folder and select the option to Run with PowerShell. If that is not allowed on your PC, see the comments in the file for a simple fix.
Installs ngrok to c:\ngrok and creates a config file called c:\ngrok\ngrok_config.yml. In the same directory, you'll see ngrok_autostart.ps1 and a wrapper ngrok_autostart.cmd. A shortcut to ngrok_autostart.cmd is added to Windows' startup apps folder.
[1] If the target system is headless, use ssh or scp via e.g. filezilla, winscp or putty to transfer the script file across.