Skill Help
For an Alexa skill to work, LMS needs to be accessible from the Amazon cloud outside your LAN. This must be a https-secured link and for your own security it should ideally have username/password protection. LMS cannot meet this requirement natively and obliges us to install a proxy to handle it. The free ngrok service is what we recommend for this.
Deploying ngrok entails installing a single binary on your machine that runs in the background and creates a so-called tunnel between LMS and the cloud, giving you a convenient personal static domain (which will include 3 random English words separated by hyphens) such as e.g. https://collapse-brave-zephyr.ngrok-free.app for accessing LMS.
Alexa ⇆ [443/https] ⇆ ngrok ⇆ [9000/http] ⇆ LMS .
Our Easy Setup web-form (see link) helps you to pre-configure and then download a script that will install ngrok for you and also configure it so that the skills can reach your LMS via that static domain. The setup process can target pCP, RPi-OS, Linux, macOS and Windows, with a tailored native script for each OS.
- First, create a free account at ngrok.com. Don't download anything from there as our script will do that for you.
- At ngrok.com go to the Your Authtoken tab from the left pane and copy your authtoken into our form.
- In that left pane you'll also see Domains — select it and then choose + New Domain to the right to generate your free static domain. Copy that into our form too.
You can then complete our form by choosing the OS of the target machine you'll run ngrok on, the LAN IP address of LMS in your local network, and finally choose a username and password to protect the tunnel. Don't re-use a favourite password here as it's stored in plaintext in the ngrok config file on your device.
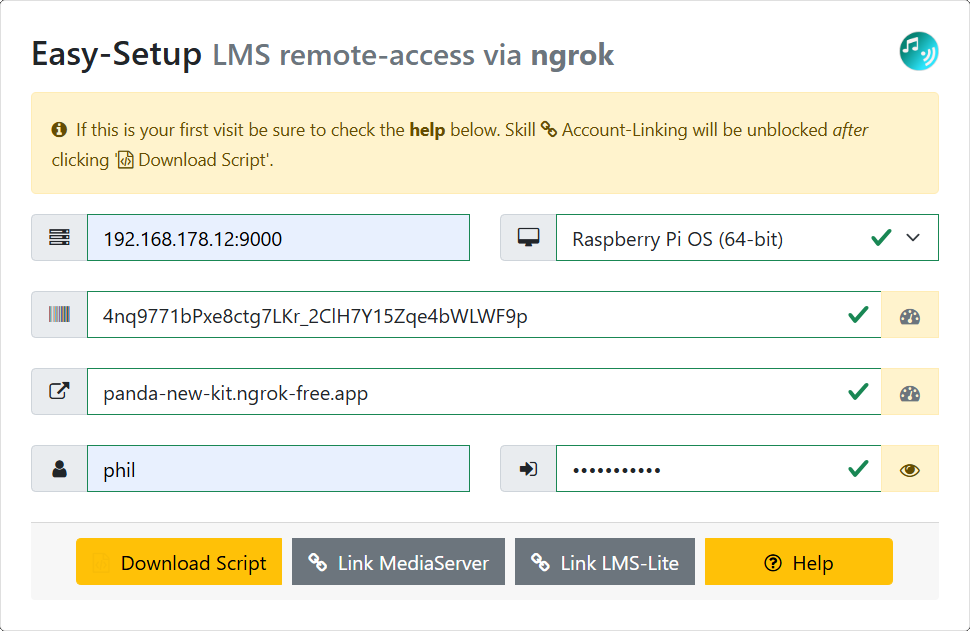
When all that is done press Download Script — your browser may try to block this as a security concern so you may have to deliberately allow the download.
Run the Script
Follow only the appropriate instructions for your OS — pCP, Linux, macOS, or Windows:
piCorePlayer
Make sure that the LMS server under pCP is already installed and running when you attempt this.
- Open a terminal. Place[1] the downloaded file setup.sh in your /home/tc directory.
- Run it using sh setup.sh
Installs ngrok as a persistent tcz package and adds it to onboot.lst. It also builds a file called ~/.config/ngrok/ngrok.yml with your configuration details. An entry in /opt/bootlocal.sh ensures ngrok_startup.sh runs at system boot to continually refresh your tunnel details when you reboot.
Debian Linuxes
Applies to any Debian-based distro which supports systemd services and
bash scripting. Examples include Raspberry Pi OS, Ubuntu, Debian and
Max2Play.
- Open a terminal. Place[1] the downloaded file setup.sh in your home directory, e.g. /home/pi.
- Run it using sudo bash setup.sh
If something does not work and you are wondering if your fetched ngrok binary is the correct version for your architecture, type file /usr/local/bin/ngrok. The output will include something like ELF 64-bit LSB executable, x86-64 or ELF 64-bit LSB executable, ARM aarch64.
Installs ngrok to /usr/local/bin/ngrok and creates a service file /etc/systemd/system/ngrok.service to run ngrok as a daemon at boot. It also builds a file called ~/.config/ngrok/ngrok.yml with your configuration.
macOS
Place the downloaded setup.sh script in your normal
Downloadsfolder.
- In the Finder, open the Applications folder and then Utilities. Double-click on Terminal to pop open a terminal.
- Inside the terminal window, typecd ~/Downloads
- Run the installer using sudo /bin/bash setup.sh (you will need to type your mac password to authorize).
Installs ngrok to /usr/local/bin/ngrok and creates a launchd file /Library/LaunchDaemons/com.ngrok.onstartup.plist to run ngrok as a daemon at boot. It also builds a file called /usr/local/bin/.config/ngrok/ngrok.yml with your configuration.
Windows
- Right-click on the downloaded PowerShell file setup.ps1 in your downloads folder and select the option to Run with PowerShell. If that is not allowed on your PC, see the comments in the file for a simple fix.
Installs ngrok to c:\ngrok and creates a config file called %HOMEPATH%\AppData\Local\ngrok\ngrok.yml. In c:\ngrok, you'll see ngrok_autostart.ps1 and a wrapper ngrok_autostart.cmd. A shortcut to that .cmd file is added to Windows' startup apps folder (usually HOMEPATH%\AppData\Roaming\Microsoft\Windows\Start Menu\Programs\Startup).
[1] If the target system is headless, use ssh or scp via e.g. filezilla, winscp or putty to transfer the script file across.
Account Linking
When you press the Download Script button, form-validation takes place and if it passes then the values you entered are all stored in your browser's localstorage meaning they'll magically reappear the next time you visit the Easy Setup webpage. The Link MediaServer and Link LMS-Lite buttons are also enabled. When you click on them, our back-end verifies that an LMS instance is indeed reachable at the fixed domain/credentials you entered. If not, you'll see a warning to check that ngrok is already running. If yes then an Amazon oauth popup will launch. If the browser you are using already has a valid login cookie for Amazon then you'll just see a message asking if it's ok to link the skill in question. If there is no Amazon cookie then you'll first be asked to login to your Amazon account and then you'll see the linking-approval message. This process both installs the skill (if you hadn't yet done that from the skills-store or Alexa-app) and also links the skill.If you have any unanswered questions then you can ask them at the Lyrion forum threads for Mediaserver or for LMS-lite.
ngrok 108 error
On the free plan, ngrok can only be run on a single machine in your local LAN. If it's already running and you start a second instance, you'll receive a 108 error. For a full list of ngrok errors, see here.
No audio using Stream commands
The /stream.mp3 endpoint in LMS requires non-mp3 formats to be transcoded to mp3 for streaming. LMS does this under the hood but it does rely on your system having the LAME encoder utility installed. If you notice that non-mp3 sources produce no sound while streaming, make sure that you have it installed. You can find information on how to do that here.
Windows Server — Run-as-Service
The easy-setup Windows installation procedure runs ngrok in a windowless
process. If you'd prefer to run ngrok as a
service that will survive logouts, do the following. You will need to
use a program that can create services from regular .exe files. An
example of a free program that does this is NSSM (Non-Sucking Service Manager). Download
NSSM and place its exe in the same directory as ngrok. Open a
cmd or Powershell terminal and
cd into the same directory as your nssm.exe.
Run the following command:
nssm.exe install ngrok
select the ngrok executable in the window that appears and add the following to the
arguments:
start --all --config=%HOMEPATH%\AppData\Local\ngrok\ngrok.yml
then press 'Install service'. The service can now be managed from service manager. Start it here
or alternatively open a cmd as administrator and run the following:
sc start ngrok