Setting up EvoControl involves 3 simple steps that you can complete in under a minute (all from here without even having to use
the Alexa app):
Create a free smartskills account using the Register button below. You may use an alias or an email address as the
username.
Login briefly (via a button on the registration form) to your Resideo TCC account to authorise the skill to access
their API. We use oauth tokens which means we NEVER see or have access to your TCC account password.
Login briefly (via a button on the registration form) to Amazon to install the skill into your Alexa account
and link it to your newly-created smartskills account. This also uses oauth and Amazon shares no credentials with
us.
Then just say "Alexa,
open Smart Heat" and you're up and running!
Unleash the true power
of your Evohome thermostats!
EvoControl Smart Heat
A Custom Alexa Skill for Evohome
Evohome on Steroids
EvoControl™ is much more than just a means to control Evohome by voice/touch. With its own cloud
storage, it cleverly extends Evohome with a myriad of features that were never in the original Resideo design brief. The
likes of Activities/Scenes, Groups, Multiple Schedules, Schedule Shifting, and Macros make it child's play to
tweak whole-house comfort with a short spoken command or a simple UI-gesture. You couldn't do that in a practical way until now because it
always involved way too many steps on your Evotouch or in the TCC App. EvoControl also features a group setpoint-editor and an
advanced schedule editor that are lightyears ahead of Evohome's native capabilities. Having EvoControl will change your
home-heating habits for the better. Because it works instantly, and it makes doing things easy.
Savings and Comfort
Let's say you normally get up at 7 AM, but tomorrow you have an early rise. It's really powerful to be able to say
"Start my day tomorrow at
6:30" to have all the schedules for zones where it matters shift accordingly. Same goes for "Delay bedtime by 30 mins"
if you want to stay up later to finish a movie. Somebody in the household about to take an afternoon shower? Saying "Activate
'ShowerTime' for 20 mins" will get the bathroom ready for just as long as needed. In fact, all EvoControl's commands can have
a time-constraint such as "… for 30 mins" or "… until 21:00" put on them.
Especially nowadays with so many people working regularly from home — plus kids living longer with their
parents — being able to easily deviate from the fixed-schedule paradigm of yesteryear is more important than ever!
More than Voice Control
When you think of Alexa you may be inclined only to think of voice-control and forget that the majority of
Alexa-enabled devices nowadays have a decent touchscreen. With EvoControl, every Echo Show, Fire Tablet and Fire TV becomes an
affordable hi-res clone of your Evotouch. 100% of the functionality available by voice is also accessible through the UI without
uttering a single word. EvoControl's gesture-enabled Widget can be parked on your Echo Show's home screen. It's lightning
fast and fully customisable (via Macros) to place all your favourite climate-control actions just a single or double-tap away. Despite all
EvoControl's capabilities, it's child's play to setup and use in ways that will really make a difference in your home. If you have Evohome,
you deserve EvoControl too!
Alexa, reduce the whole house by 1° for half an hour
Alexa, set the Bedrooms Group to 21° for 30 mins
Alexa, make it 20° in the Livingroom & Kitchen
Alexa, set the TV Room to 20° until 8 PM
Alexa, set the Lounge to 22° for 40 minutes
Alexa, raise the whole house by 1° for an hour
Alexa, start my day tomorrow at 6AM
Alexa, I'm going to bed at 10PM
Alexa, set the heating mode to Economy until 9 PM
Alexa, make it 22° in the Bedroom at 11 PM
Alexa, make it 18° at 5 PM for 45 mins
Alexa, make it 17° from 8 PM until 21:30
Alexa, set the Kids Rooms to 20°
Alexa, increase the Upstairs Rooms by 0.5° until 11PM
Alexa, set the system to Boost for 30 minutes
Alexa, delay going to bed today by half an hour
Alexa, I'm going to bed 20 minutes earlier than usual
Alexa, lower bedtime temperatures by 2°
Alexa, move suppertime forward by 15 mins
Highlights
Click on the Images for an Explanation
Introduction
Many roads lead to Rome
Dashboard
System Overview in HD
Activities/Scenes
The shortest path to Energy Savings
Multiple Schedules
Every zone gets 3 + 1 schedules
Schedule Shifting
Advance/Defer or Reschedule daily 'moments'
Schedule Editing
Modify switchpoints in Bulk
Schedule Comparison
Graphical Depiction of Schedules
Groups
Up to 12 named Zone-Groups
Setpoint Editor
Set multiple zones in unison
Widget
Quick Glance / Macros / Actvity Triggering
Smart Home Integration
Charting, Demand & More
Multiple Locations
Unite multiple Evohome Systems
Diagnostics
Real-Time Fault Reporting
Settings / Preferences
Configure Groups, Nicknames, etc
Zone Sort Order
Choose your preferred arrangement
Aliases
International Zone Names
Example Commands
So many ways to say a command…
Screenless
Uncomplicated ease-of-use
Usage Tips
Some useful Pointers
Get Started
It takes less than a minute…
• Can be used in any country on all Alexa-enabled devices set to English or German
• A 12-month activation (without contract) normally costs £20 but usage is currently free!
Humans tend to be predictable in their habits and that's why the basis in any home heating system is
the concept of schedule. It means setting a baseline temperature for each zone that's only dependent on two things:
day-of-week and time-of-day. With a basic assumption that all weeks are the same, it's a rinse and repeat
paradigm.
Nowadays with so many people working regularly from home — plus kids living longer with their parents
— being able to easily deviate from that fixed-schedule paradigm of yesteryear is more important than ever. Evohome
itself remains schedule-based, what EvoControl adds is the ability to instantly and spontaneously tweak
schedules and zone-overrides throughout the day:
Constrained Overrides facilitate immediate ad-lib setpoint-changes in any number of zones or
groups:
Alexa, raise the whole house by 1° for an hour
Alexa, reduce all zones by 2° for 2 hours
Alexa, set the Office to 20° for an hour
Alexa, make it 20° in the Livingroom, Diningroom & Kitchen for 30 mins
Alexa, set the TV Room to 18° until 2 PM
Alexa, set the Kids Rooms to 20° for half an hour
Alexa, set the Bedrooms Group to 21° for 30 mins
Alexa, increase the Upstairs Rooms by 0.5° until 11PM
Scenes/Activities imply using friendly-names of your choosing for pre-meditated combinations of
setpoints/deltas plus the zones they should apply to. They can have a delayed start or trigger immediately and their
duration can be optionally constrained:
Alexa, activate 'Watch TV'
Alexa, start 'MovieTime' for 90 minutes
Alexa, activate 'Office Vacant' for 45 minutes
Alexa, trigger 'Studying' until 9 PM
Alexa, schedule 'Siesta' starting at 2PM for 1 hour
Alexa, schedule 'YogaTime' to start at 11AM
Alexa, schedule 'Working' from 4PM until 6:30PM
Schedule Shifting facilitates live-schedule modification centred around the concept of
easy-to-understand day-segments — it may also be thought of as 'Schedule Advance' or 'Delayed Start'.
Segment names are all (generous) syntactic variations of 'Waking Up', 'Lunch Time', 'Dinner Time', 'Going to Bed':
Alexa, start my day tomorrow at 6AM
Alexa, I'm going to bed at 10PM
Alexa, my lunch break tomorrow starts at 1PM
Alexa, dinner today will be at 17:00
Alexa, delay bedtime by 45 mins
Alexa, defer getting up tomorrow by 30 mins
Alexa, advance lunchtime tomorrow by one hour
Alexa, move suppertime forward by 15 mins
Alexa, postpone dinner tomorrow by 30 mins
Alexa, extend bedtime by 15 mins
Alexa, shorten lunchtime by 30 mins
Alexa, sidestep my lunch break tomorrow
Alexa, increase suppertime temperatures by 1°
Alexa, lower bedtime temperatures by 2°
Alexa, revert to baseline
Multiple Schedules mean you have more than a single baseline to start out from — there are 3x
ABC presets plus the nest_thermostat_sensor_eu Live schedule for a total of 4:
Alexa, upload schedule A in the Kitchen
Alexa, restore schedule C in the Livingroom, Bathroom & Bedroom
Alexa, select schedule Beverywhere
Alexa, upload schedule A to the Bedrooms Group
Switchpoint Insertion allows spontaneously adding additional switchpoint(s) to the current live schedule by
voice command:
Alexa, make it 19° in the Kitchen at 4 PM
Alexa, make it 20° in the Bathroom at 5 PM for 45 mins
Alexa, make it 17° upstairs from 8 PM until 21:30
Alexa, I'd like it to be 22° in the Bedroom at 11 PM
Bulk Setpoint Editing. The onscreen interactive setpoint editor has and
buttons that allow
you to tweak all zones in steps of ± 0.5° or ± 3° in unison. Combined with the groups paradigm,
it makes it trivial to alter several zones in one swoop.
Zone-specific Standby. You can double-tap any tile on the Widget to drop the zone in question to a setpoint of
5°. Double-tap again to bring it back to scheduled operation. While 'down' in this manner the zone will still respond to
local overrides from e.g. the knob of a HR92. On the DHW tile, the toggle works as a quick-action to switch hot water
on/off. In fact, via Macros you can even customise this behaviour fully and for every zone independently.
These different methods can be combined at will to suit the particular circumstance, while each
family member can have their own favourite 'approach'. All of these commands can also be triggered by tapping icons
on the screen of your Echo Show, while Activities can even be triggered by tapping on the skill's widget.
Dashboard
System Overview in HD
The Dashboard is home-screen for the skill and is automatically displayed upon launch if your
Echo has a touchscreen or if you are using a Fire Tablet or Fire TV.
All your zones (including DHW, if you have it) are shown in their own tiles in a colour-scheme
familiar from the Evotouch and TCC[1] App. The header boasts a weather-forecast icon flanked by the outside temperature.
You'll also see the System Mode as an icon
nest_eco_leaflocal_fire_department which can be tapped to change both the mode and its duration. Within
the tiles, any zones calling for heat will have a symbol. Above
each tile, the tint associated with a zone's actual/measured temperature is
indicated in a small header-bar.
What's visually
different to your Evotouch is the colour-coded appendage under each zone. It identifies the currently-active
ABC schedule for each zone, showing if
the live schedule does not match a preset. It also displays the next-expected switchpoint from the zone's current
schedule (i.e. the time-of-day plus the setpoint SP). Arrows ↑, ↓, ↔ next to the
SP indicate whether it will lead to an increase/decrease/no-change to the current SP. In the
settings you can choose to hide the appendage when the next switchpoint implies no change to the
zone's current SP (as seen in Guestroom/Garage in the screenshots above). In Away and HeatingOff system modes, the appendages disappear because the schedule is then
inactive.
To remind users of the syntax for the many features of the skill, a revolving array of usage
hints/tips is shown in the centre of the footer. To the left, there are touch-enabled icons for selecting
Scenes, nest_thermostat_zirconium_eu Setpoint-Editor, LaunchPad, Schedule Shift, Help, and Settings. To the right you'll see optional icons if certain features are enabled:
battery_unknown Battery (with a HGI-80 in
use, this reports HR92/CS92 battery percentages and incidentally shows heat-demand as percentage values), Peek (if you have hidden any tiles to reduce screen clutter, toggling
this will show/hide those zones), Graphing (if you have connected a
HGI-80, this draws a graph of
the previous 24h's climate in a zone), Location
(to switch between up to 4 Evotouches if you have more than one location registered to your TCC account), plus warning Show Faults which
will appear as the rightmost footer-button (only) whenever there are any
TCC or HGI-80 faults present.
In the case of multiple locations, you'll always see the selected location e.g.
or in the header. Tapping that icon will
display the location's friendly name. On the topic of optional icons, if you have a HGI-80 in use then a symbol with
the aggregated boiler demand percentage will appear in the header.
You can assign a default zone to each of your Echos by saying e.g. "Alexa, the default zone is
the Kitchen". Subsequently, when speaking to a particular Echo, you can omit the zone name (or just say
'here') — "Alexa, make it 20° for 30 mins" (without mentioning Kitchen in the command) would then target the
Kitchen zone by default. It can be reassigned at will and deleted by saying "Alexa, delete the default zone".
If you have a lot of Evohome zones combined with a smaller screen on your Echo, it's possible to hide
certain tiles from the normal view and have them only appear whenever you press the Peek button (which itself only shows if you've actually hidden anything). Visit the
ad_group_off Hide Tiles button on the
Settings page to set this up.
Note that a much more limited display experience is provided on the 1st gen. Echo Spot with round screen, while the new
2nd gen Spot with the hemispherical screen supports no visuals whatsoever.
You also cannot create/edit activities/scenes or groups — nor create multiple schedules — without
having a rectangular screen.
Important: Users whose spoken language is not natively
supported by Alexa should visit the section on Aliases for an
explanation of how to help Alexa understand 'foreign' zone names. It's also a boon for
heavily-abbreviated English names like 'Mstr Bdrm R'.
[1] TCC is the abbreviation for Total Connect Comfort (link) which is Resideo's App/Portal for controlling
Evohome via a smartphone or browser.
Activities / Scenes
The shortest path to Energy Savings
Activities (also called Scenes) are simply a means to provide a friendly name to
a set of pre-meditated setpoints that are all applied simultaneously (either as overrides or schedule-edits) to
zones that participate in the scene. You can create up to 12 of them using the skill's touchscreen scene-editor.
They can be triggered at will by voice or touch, be tapped into action from the skill's
widget, be scheduled for later activation or triggered immediately, have an optional time constraint in the
form of an until/duration applied, and they can even be launched from Alexa routines.
Each participating zone has either its own setpointSP or else a
deltaΔ (±6°) which you decide upon when creating the scene. With DHW you of course specify
on/off state rather than SP. Any activity can mix/match SP/Δ as
desired, while any zones you omit from a scene are always unaffected when you trigger it. To assist in
visual selection, each scene can have its own icon which you may choose from a library of (currently) 84 popular
symbols!
As an example of the concept, the 1st screenshot shown above is of an activity named
'GoodNight' which requests a delta of -2° for the LivingRoom to lower its setpoint by 2° (a +2° delta would
raise it), sets the Wardrobe zone to 18.5°, the Bedroom to 20°, the Bathroom to 22.5°, and leaves all other zones
unaffected.
On the start-page (reached from Scenes on the
dashboard) you'll see buttons for
help_center
Help to the
left, plus
Previous and Next to browse sequentially through your existing scenes
Edit to unlock the currently-shown scene for editing
New which opens the editor to start creating a new
scene from scratch
farsight_digital Delayed Start to
launch a popup with 2 sliders to define the Start-Time & Duration to apply when activating the current scene later
today
history_toggle_off Duration to launch
a popup with a single slider to define the duration when the current scene is activated immediately
task_alt Activate to immediately
activate the currently-shown scene without any duration constraint. In this case, the override(s) will apply until the
next naturally-occurring scheduled changeover for each participating zone
Whether creating a scene or editing an existing one, a single tap on the centre of any tile
toggles inclusion/exclusion in the Activity. Either a long-press or a double-tap can be used to toggle
between SP/Δ mode for the zone. A long-press on the ▲/▼ arrows above/below the tiles alters the SP/Δ in steps of 3°,
while a short tap results in a 0.5° step. Whenever at least 1
zone is highlighted during creation/editing the Assign
Name button is enabled — it will open an on-screen popup so you can type a name (max. 28 chars) for the
activity when you're all done. You'll then be able to tap either Save
to save the newly-created scene or Cancel if you change your mind.
When browsing scenes, zones that do not participate will show heat in the centre of the tile and also be dimmed. When in edit mode, the
centre-icon will change to a add to indicate that
tapping it will add the tile in question into participation.
The min/max allowed SP limits (usually 5° and 35° for the HR92) are always
enforced by the skill, so if you have an extreme delta and the setpoint is already critical at the trigger-moment, you'll
never inadvertently exceed the allowed floor/ceiling values when the activity triggers.
If you choose task_alt Activate, any deltas
in the scene are applied with respect to the
current TCC SP for the zone(s). For farsight_digital Delayed Start the schedule is examined for the nearest
prior SP and a new SP with the Δ applied on top
of that prior value is inserted into the schedule.
The final 2 images in the slideshow above show the icon-assignment and icon-selection
screens, wherein a custom icon of your choosing can be associated with each user-generated activity (system-generated items
have icons that cannot be reassigned). Any custom icons will also appear on the skill's widget. During the allocation
process, upon tapping any icon a magnified view will be shown with the option to assign or reject that icon. This makes it
easier to see intricate details on the small 5" Echos.
If an activity name ends with 1-3 digits plus either an 'm' or apostrophe (shorthand for minutes)
then the activity in question will be activated for that particular duration in minutes via a TemporaryOverride.
There should be no space(s) between the digits and the m/'. Examples: HW Boost 20m, HW Boost
120', Shower Time 15m. This
automatic constraining only applies when the activity is triggered from the LaunchPad (or the widget) and not when activated by voice or via
the task_alt Activate button you'll see when
browsing through your scenes.
Some example scene-related commands:
"Alexa, open Smart Heat"…
Alexa, show activities / scenes
Alexa, activate 'Watch TV'
Alexa, activate 'Boost Upstairs' for 20 minutes
Alexa, activate 'SummerTime' permanently
Alexa, trigger 'Studying' until 9 PM
Alexa, start 'MovieTime' for 90 minutes
Alexa, schedule 'GoodNight' to start at 10PM
Alexa, schedule 'Working' from 4PM until 6:30PM
Alexa, schedule 'Siesta' starting at 2PM for 1 hour
Alexa, list my activities
Alexa, revert to baseline
Standby
When you first launch EvoControl Smart Heat, you'll see that an activity called Standby has
already been created for you. It's a useful alternative to HeatingOff
and also assigns a setpoint of 5° to all your zones. There is one
important difference though — when the system is in true HeatingOff mode, Evohome rejects local overrides from your TRV valves and will
also ignore spoken SP-changes via EvoControl. With this Standby activity active, any
zone-overrides will still be handled. Some examples:
Alexa, activate 'Standby' → until each zone's next scheduled switchpoint
Alexa, activate 'Standby' for 2 hours
Alexa, activate 'Standby' until 4PM
Alexa, schedule 'Standby' to start at 7PM
Alexa, schedule 'Standby' to start at 8PM for 2 hours
Alexa, schedule 'Standby' from 2PM to 3:45PM
Alexa, activate 'Standby' permanently
Alexa, revert to baseline
Avoiding Pitfalls
Here are a few pointers worth remembering about activities/scenes:
You should be mindful that the changes introduced by a 'previous' activity don't auto-revert just because you trigger
a 'new' activity — that's by design.
Any successively-applied Δs are accumulative — while SPs are
independent and always supplant each other — when successively applied to the
same zone.
Activating a scene — even one that involves all zones — doesn't change the System
Mode but rather alters the mode(s) of the involved zone(s). For that reason, saying "Set the System Mode to Auto"
won't have any effect on live activities!
To revert a scheduled activation you need to re-apply whatever schedule was in place beforehand. The command
"Alexa, revert to baseline" can be used for any zones to which ABC's happen to be assigned
(that's because the baseline concept 'remembers' which preset was previously assigned to each zone) but won't help if you
have any non-ABC zone(s) with manual schedule-edits. There's a button labelled Baseline on both the widget and the LaunchPad to do this by touch. The section on Usage Tips has a suggestion for using an Alexa routine to automate this
task every day so you cannot forget.
Reverting an immediate (non-scheduled) scene/activity means setting all zones to FollowSchedule. The Reset
button on the LaunchPad or widget achieves
this. By voice, you can say either "Alexa, set all zones to follow-schedule" or "Alexa, reset the system mode".
Multiple Schedules
Every zone gets 3 + 1 schedules
Evohome natively supports a single-schedule paradigm but EvoControl Smart Heat can store up to
three full schedules in your EvoControl account for upload to TCC at will (the nest_thermostat_sensor_eu Live
schedule is separate so in reality the skill manages 4 schedules for you). This can be very useful e.g. for switching
between Night/Day work-shifts or Summer/Autumn/Winter schemas. The extra schedules are referred to as ABC but a
nickname can be assigned to them in the skill's settings to jog your memory. Which of the
ABC schedules is currently-active for a zone is shown in each tile's dashboard-appendage:
There's another more day-to-day reason for having multiple schedules — they are easy to
revert to when you need to 'undo' temporary schedule-edits that should not be repeated every week (remember
that with Evohome, schedules recur naturally every 7 days). The multiple-schedule paradigm in EvoControl merely swaps out a
saved 'alternative' schedule to the Resideo cloud every time you undertake a non-trivial schedule-related action.
With EvoControl, you can easily specify setpoint changes that should apply later today rather
than starting now. If at 13:30 you say "Set the Kitchen to 20° until 2PM", that change starts now and is just a
regular TemporaryOverride. However, you can also say e.g. "Make it 20° at 4 PM for 30mins" and
that change will not be immediate but will take effect at 4PM (and last until 4:30PM). This is achieved by
dynamically modifying the active schedule. Schedule Shifting also does this via a different route. That 'temporary'
convenience-schedule can be discarded after use by reverting to a saved ABC.
As a visual reminder, after you have edited the active schedule so that it no longer matches any
ABC preset, the appendage(s) on the main dashboard change so as to indicate . You should be mindful of that symbol every time you see it and ask yourself
if this is what you want Evohome to do next week also…
EvoControl's week-at-a-time schedule view is reached by tapping on any tile on the main
dashboard. You'll notice a grey border around today's day-name in the header, while a vertical grey bar is drawn beside the
switchpoint that resulted in the current SP/state for the zone (which can be from last night if
there was no switchpoint this morning).
The footer contains buttons for topic-specific
help_center
Help to the left, plus nest_thermostat_sensor_eu and the self-explanatory Edit,
Save As, More and task_alt
Go Live[1] to the right. The nest_thermostat_sensor_eu button represents the
Live schedule and you'll notice that task_alt Go Live is
disabled when it is chosen (because it's already live).
The logic with these buttons is that you first select one of nest_thermostat_sensor_eu
before choosing one of the other buttons, whereby those subsequent buttons will then act upon the chosen schedule/preset.
If any of the buttons are greyed out, it means that no
preset has (yet) been saved under that button for the zone in question. Note that the Edit functionality has its own chapter/tab on the website (here) and is therefore not described in any detail in
this section.
The top right corner of most of the screens associated with schedules will display the so-called
Badge indicating which preset is being displayed. Where relevant, the Badge will be captioned with the nickname associated with
the preset. In the case of the nest_thermostat_sensor_eu Live schedule the Badge will reflect whether it matches one
of the presets or whether it has not been saved to any preset and is effectively a .
The thick coloured border around the schedule grid/cells will also
reflect the colour associated with a schedule — for nest_thermostat_sensor_eu, for , for
, and for .
Choosing More will reveal a further 5
buttons to operate on the already-selected schedule-variant:
ΔT 24h will plot the weather
service's forecast outside temperature for your location against the schedule in question (the 'gap' between these 2
plots provides a rough estimate of when gas/energy will be required to heat a zone or not)
Graph Form will allow you to see the selected schedule
plotted as a stepwise-graph function instead of a cell-grid
stacked_line_chart Compare ABC draws
the live schedule plus the ABC presets together in the same stepwise-function chart and makes it
simple to visualise the differences between the different schedules
Copy to Zone will pop a zone-selector screen to choose
zone(s) to clone the selected schedule/preset to
Delete will delete the preset in question (note you cannot
delete the nest_thermostat_sensor_eu Live schedule so this button is greyed out whenever that is
selected)
Some example schedule-related commands:
"Alexa, open Smart Heat"…
Alexa, show the Bathroom schedule
Alexa, make it 19° at 4 PM → inserts 1x switchpoint
Alexa, make it 18° at 5 PM for 45 mins → inserts 2x
switchpoints
Alexa, make it 17° from 8 PM until 21:30 → inserts 2x
switchpoints
Alexa, undo → retracts the most recent insertion
Alexa, upload schedule A in the Kitchen
Alexa, restore schedule C in the Livingroom, Bathroom & Bedroom
Alexa, go back to schedule B everywhere. → Note that
this will include DHW if you have it.
Alexa, upload schedule A to the Bedrooms Group
Alexa, restore schedule C in the Bedrooms
Alexa, revert to baseline
When you first enable EvoControl, it automatically fills the A preset with
your current TCC-cloud schedule for all zones (plus DHW, if applicable). This is so that you can easily revert to
A after a temporary schedule-edit. You can of course alter this preset at any time and it's merely
a starting-out convenience.
[1] Note that Go Live pushes the desired schedule
to the TCC cloud but whether it will actually apply immediately or not is dependant upon the current system mode.
Schedule Shifting
Advance/Defer or Reschedule daily 'moments'
Schedule Shifting is the name given to live-schedule modification centred around the concept of
blocks or day-segments. It may also be thought of as 'Schedule Advance' or 'Delayed Start'. You can use it
via the Schedule Shift button on the main dashboard or by
spoken command.
From a time perspective you can advance/defer switchpoints by simply specifying how
much earlier or later than 'normal' anything bounded by the block should start. All the relevant switchpoints then
shift by the same Δt (i.e. time). It's also possible to directly specify a time-of-day such as 6AM
instead of a shift value. Under the hood, that translates to a Δt for the first active switchpoint which is then copied to
all later switchpoints in the block. Finally, you can lengthen/shorten a block's effective duration by pulling in or
pushing out all the switchpoints except for the first one for each zone.
Setpoint-wise, you can choose to sidestep blocks to coast over them with a continuous
zone-specific SP. In that case, each zone's most recent scheduled SP from
before the block-start is copied to all the switchpoints in the block. Finally, you can request a ± temperature
adjustment to make the target zones warmer or cooler than usual throughout the block's duration. All
relevant SPs are then raised/lowered by the same ΔT (i.e. temperature).
You'll first need to perform a one-time setup under the Segments button on the settings page:
The idea is that you assign chronological boundaries to 4 named blocks —
Waking Up, Lunch
Time, Dinner Time, Going to
Bed — as suited to your household. Default
time-values will have been filled in for you but these can be changed to suit personal preference — tap on the
text of any time-span (e.g. 05:00-09:00) to edit. Just make sure that the boundary times are 'wider' than the normal range
of times found within your weekly schedule so that the blocks will always address your situation correctly. Note that if
times are not monotonic/sequential across the 4 blocks then your edits will be rejected.
For each block you get to choose which target zones should be affected whenever you earmark
the related timespan in a shift-command. DHW can participate too. Tap any of the 4 Zones buttons (if you have DHW you'll see Zones/DHW) to assign/change participants. Observe the numerical '→' captions that
reflect the number of currently-assigned target zones for each block, plus a red droplet symbol for hot water if present. Inclusion/exclusion uses the familiar
zone-selector you will already have seen for both group-edit and schedule-cloning.
Each time you invoke a schedule-shift command, EvoControl will first check which of the target zones
have any upcoming schedule-switchpoints that currently fall inside the block in question. From a setup
perspective you never have to mark individual switchpoints in your schedule(s) as it's all based on a
within-the-boundaries paradigm. Dynamic, simple and yet very effective!
Example: 3 zones involved in delaying BedTime by 30 mins (22:50 → 23:20)
Shifting via the UI
From the main dashboard, choosing Schedule
Shift will display a screen with several tappable icon buttons
plus a slider.
You first choose either Today or
Tomorrow in order to enable/disable the 4 block-select
buttons Waking Up, Lunch
Time, Dinner Time, Going to
Bed
based on what is allowable/sensible given the current time of day and the current live schedules. For example, any blocks
that have already passed for the day in question will show and be greyed out,
while blocks that simply have no relevant switchpoints in their target zones (or only a single switchpoint in the case of
Shorter/Longer) will show --. Go ahead and
select which available block you intend to shift.
Next, you choose one of 5 operations: Cooler/Warmer, pace Shift, farsight_digital Time of Day, Skipover, or Shorter/Longer to apply. Depending on the chosen day and operation, the screen will
show the current scheduled start-time for the initial switchpoint found within the block in question among the
participating zones/DHW. Moving the slider left/right of centre will now allow you to select up to ±3° for Cooler/Warmer or ±180 mins for pace Shift, farsight_digital Time of Day, and Shorter/Longer. The slider's caption will automatically translate the ±
minute values to e.g. ⌚ 6AM and vice versa. Observe that the slider disappears for the Skipover function as there's then no shift-value involved. When ready, press
task_alt Go Live or else hit the back button to abort. The Segments
button from the settings page is repeated here as a convenience to consult the segment time-spans if desired.
Alexa's spoken feedback and the resultant visual screen-popups will be the same as for the spoken
version of the command(s). Note that if you have not yet visited the Segments page to define target zones, you will be automatically taken there
whenever you use the Schedule Shift
button on the dashboard.
To restore 'normal' schedules again, use the button labelled Baseline from either the widget or the LaunchPad on the main dashboard.
Shifting by voice command
In daily use, many syntactic variations of the 4 block names (and also the command-verbs) are
supported so that the wording when actually using spoken commands is not rigid.
Whichever form your shift command takes, you'll be told how many zones are involved — with
their shifted time-of-day or temperature — and on Echos with a screen you'll see a brief dashboard-popup
highlighting the affected zones where the tiles appendages will visually reflect the changes. If you try to shift a block
that's already passed for today, Alexa will tell you. If the block boundary has already 'started' but the initial
switchpoint(s) for all the target zone(s) have not yet occurred, the shift/reschedule operation will still be allowed. If,
however, there are already-active switchpoints within the block-extremities then the command will be refused.
Some example schedule-shift commands:
"Alexa, open Smart Heat"…
Alexa, start my day tomorrow at 6AM
Alexa, I'm going to bed at 10PM
Alexa, my lunch break tomorrow starts at 1PM
Alexa, dinner today will be at 17:00
Alexa, sidestep my lunch break tomorrow
Alexa, increase suppertime temperatures by 1°
Alexa, lower bedtime temperatures by 2°
Alexa, delay bedtime by 45 mins
Alexa, advance lunchtime tomorrow by one hour
Alexa, defer getting up tomorrow by 30 mins
Alexa, lunchtime tomorrow should be half an hour later than usual
Alexa, move suppertime forward by 15 mins
Alexa, postpone dinner tomorrow by 30 mins
Alexa, extend bedtime by 15 mins
Alexa, shorten lunchtime by 15 mins
Alexa, revert to baseline
Alexa, when is bedtime today?
Alexa, what time is wake-up tomorrow?
Saying "Alexa, undo" is supported and will work if it's said immediately after you make an
inadvertent change. This will restore the schedule that was in effect just before you made the utterance.
Note that you cannot specify a day-name with these commands, but you can mention today
(default) or tomorrow. That's deliberate because shifting/compansion is accumulative and if you were to shift
things too far in advance there's a possibility you might forget you already did so and perhaps inadvertently shift
again.
The command to revert to baseline returns each zone to its most recent ABC schedule,
providing an ideal means to return to normal after a shift that should not be repeated next
week. It works because EvoControl keeps track of which ABC preset was most recently uploaded to
each zone individually, whether by voice or touch inputs. You'll notice zones not currently deploying an ABC by means
of the indicator in the dashboard
appendage(s).
Schedule Editing
Modify switchpoints in Bulk
You can do simple editing of today's schedule using voice inputs, but not create/modify a
whole week's schedule by voice. For that we have the touch-enabled bulk switchpoint editor which is reached
by selecting Edit while viewing a nest_thermostat_sensor_eu Live schedule or
ABC preset. As a reminder, you view a zone's schedule by tapping its tile on the main
dashboard.
Upon selecting Edit, 9 buttons will be shown
in the footer and the entire schedule grid is automatically selected/highlighted for editing. If you indeed wish to modify
all the switchpoints in unison, go ahead and tap any of the relevant history , update
, , or
buttons (collectively called the
MOD buttons hereafter). A long-tap or double-tap on any of the MOD buttons
will perform ± 1h and ± 3° instead of the captioned ± 10mins and ± 0.5°.
You'll also see a New SPs button on this screen which will launch
a popup to allow you to add new switchpoints. More on that in a moment.
To drill down and choose specific cell(s) to MOD, tap any cell in the grid
to switch to selective editing. The grid will dim and only the selected cell(s) will be highlighted to full
brightness. Tapping a day-name selects the entire vertical column for that day, while a long-tap or
double-tap on any cell selects the entire horizontal row of cells around it. Re-tapping simply deselects
accordingly. The MOD buttons now address the highlighted cells.
You'll also see a Del SPs button which
will delete all the highlighted switchpoints. Because Evohome requires a minimum of one switchpoint per day for
every zone, this button will be greyed out if that rule would be broken. Two extra buttons appear on this screen:
Unselect All and open_with Select All. The former will take you back to
an empty grid of cells ready to select new ones, while the latter exits selective mode and returns to the main edit screen
with everything highlighted again and all your edits intact. Note that you can repeatedly select-MOD-deselect
until all your envisaged edits are completed — there's no
need to switch screens for multiple edits. As a visual aid to which cells were already modified in this session, a crimson
icon is shown on modified switchpoints.
As mentioned above, the New SPs button can
be used to add switchpoints to the schedule. When tapped, it launches a popup with buttons to select the
day-of-week, plus 2 sliders to select the time-of-day and the desired setpoint (or 'on/off'
state for DHW). Tap the task_alt button on the popup to finalise the
new switchpoint(s).
Just as Evohome requires a minimum of one switchpoint per day per zone, a
maximum of 6 switchpoints
is allowed on any single day. Those days which already have 6 switchpoints will therefore be blocked from adding new switchpoints here.
If you attempt to add a new switchpoint at a day/time which already has a switchpoint (even if its setpoint is different to
the setpoint you have now chosen), the entire add-action is blocked until you resolve. You'll incidentally notice the historyupdate
buttons being blocked if moving time-of-day values back and forth across
day/midnight boundaries threatens to introduce more than 6 switchpoints on any particular day.
Once any cell(s) are actually modified and not just selected, the task_alt Go Live[1] and Save
As buttons in the main footer become enabled. The former will upload the modified schedule
to the nest_thermostat_sensor_eu Live
slot for the zone, while the latter pops a selector
screen to choose one of to receive the edited schedule.
Cancel will always discard all current edits and
return you to the unedited original. Note that the Back button in
the top left corner is removed after any edit has been made so
that you don't inadvertently exit an editing session without deliberately choosing whether to keep or discard edits.
Schedule Backup & Restore
Note that you can easily backup and restore the entire skill configuration (which
includes your schedules) from your smartskills Account Dashboard
to a file on your PC/Mac. This can be useful if you fear inadvertently messing up
carefully-crafted schedules. By keeping different versions of that file, you can switch between multiple/different
ABCs and therefore access more than 3 schedules — there's no practical limit! Plus, if
you ever have to swap out an Evotouch panel, this will allow you to re-apply your old schedules to the new panel in the
blink of an eye. The how-to is here.
[1] Note that Go Live pushes the edited schedule
to the TCC cloud but whether it will actually apply immediately or not is dependant upon the current system mode.
Schedule Comparison
Graphical Depiction of Schedules
A picture paints a thousand words and a graph can sometimes convey more useful information than a
grid. That's why each zone's ABC switchpoints can be plotted graphically alongside the
nest_thermostat_sensor_eu Live schedule
for the zone.
You get here by visiting the schedules view after tapping on a tile on the main dashboard. It does
not matter which of a zone's schedule-variants you view initially as the graph depicts all 4 variants anyway. Choose
More and then tap thestacked_line_chart Compare ABC button. The top right corner of the graph
screen shows a Badge with a double_arrow
icon that can be used to move on to the next day of the week for the comparison.
If you tap on the 🔴 🟠 🟢 🔵 caption text then the plot for that particular curve
toggles opacity between 1.0 and 0.3 so that you can better compare overlapping portions of the stepwise
line-segments.
Groups
Up to 12 named Zone-Groups
Activities and Groups both address simultaneous setpoint-changes for multiple zones but they
do so differently. As mentioned earlier, with activities you pre-determine the setpoints/deltas when the activity is
created. With groups on the other hand, the desired setpoint (or increment/decrement adjustment) is mentioned as
part of the spoken command each time you address a group. Both paradigms have their uses!
Let's say you have a group called 'Bedrooms' with 2 members: 'Master Bedroom' and 'Guestroom'. If
e.g. Master Bedroom was currently set to 18° and Guestroom was set to 20°, saying "Alexa, increase the Bedrooms Group by
1°" would assign 19° to Master Bedroom and 21° to Guestroom. Saying "Alexa, set the Bedrooms to 15°" sets the whole group
to 15°. Whether you include the word 'Group' or omit it is optional but it can be useful for disambiguation if you
have a regular zone with a very similar name. Groups can also be the target for ABC schedule
commands.
You can view/edit groups by visiting linked_services
Groups from the Settings page. The very first time you come
here you'll automatically be in edit-mode so as to create your first group. Tap whatever zones you'd like to see involved
(DHW cannot participate) and hit Assign Name
when ready. Note that naming does not become active until you have selected at least 2 zones because a group must have more
than one zone to make any sense. After submitting the desired name, choose Save to register the group.
On subsequent visits to the Groups page, you'll see buttons for Previous and Next to browse sequentially through your existing groups, Edit to unlock the currently-shown group for editing, and
New which opens the editor to start creating a new group
from scratch.
Whenever you launch the nest_thermostat_zirconium_eu Setpoint-Editor screen you'll have the
opportunity to pre-populate the editor with only the zones from one of your groups so as to edit group-setpoints by touch
rather than spoken command.
Some example group-related commands:
"Alexa, open Smart Heat"…
Alexa, set the Kids Rooms to 20°
Alexa, set the Bedrooms Group to 21° for 30 mins
Alexa, increase the Upstairs Rooms by 0.5° until 11PM
Alexa, set the Cellar Group to 10° permanently
Alexa, lower the Downstairs Group by 1°
Alexa, upload schedule C in the Bedrooms Group
Alexa, list my groups
Alexa, show the group-creator
Setpoint Editor
Set multiple zones in unison
The nest_thermostat_zirconium_eu Setpoint-Editor button on the main dashboard
will take you to a screen that allows you to easily change setpoints SP of individual zones, of
Groups, or of the whole house in unison. It looks a lot like the Scene/Activity Editor, with the exception that the
centre of the tiles is not tappable here. You'll also observe that the current actual temperatures in the zones are shown
in the left-hand corner of each tile next to a 🌡 symbol.
If you wish, the linked_services Use Groups
button to the left allows you to cycle through your
groups so as to pre-populate the tiles and restrict the set of zones that the editor will subsequently operate on. When a
group is chosen, non-member zones are de-selected. You can always ignore the Groups paradigm here and just leave all zones
highlighted. Also, the button itself is greyed out if you haven't (yet) defined any Groups.
The and buttons in the footer always operate on highlighted zones (not DHW) in
unison. A long-tap or double-tap here will result in ± 3° instead of the captioned ± 0.5°.
On individual zones, a long-press on the ▲/▼ arrows
above/below the tiles alters the SP in steps of 3°, while a short
tap results in a 0.5° step. For the DHW tile, long-press is disabled and the ▲/▼ are replaced by / symbols.
As a visual aid to which tiles were already modified in this session, a crimson icon is shown on modified tiles. Note that after any change is made, the
linked_services Use Groups, Previous and Next buttons are disabled so as not to inadvertently ruin your current
edit.
You can mix-match any of the above modification possibilities until all your edits are complete.
Choosing the history_toggle_off Duration
button will launch a popup with a slider to define the duration to apply to the setpoint changes you've just made, while
the task_alt Go Live button implements the
changes without any duration constraint. In this case, the override(s) will apply until the next naturally-occurring
scheduled changeover for each modified zone.
If you want to abandon an unsubmitted edit, you can use the
back button at the top left of the screen or alternatively press the Cancel
button. You can say "Alexa, undo" even after you already submitted the
changes, provided it's the first spoken command after the submission. This will restore the setpoints that were in effect
just before the edits.
The SysReset button to the left does the
same as Reset
on the LaunchPad or widget — namely set the system
mode to
AutoWithReset (a setting the API supports but which is unavailable from your Evotouch panel).
Choosing it sets all zones to FollowSchedule and cancels all overrides. It's deliberately called SysReset
here so that you don't inadvertently think it will just 'undo' any changes you made in the UI on this screen.
Note: When the system mode is Away,
the editor is unreachable. If it's HeatingOff then only DHW is mutable
(if you have it).
Widget
Quick Glance / Macros / Actvity Triggering
On any of your supported Echo Show devices, you can install a Widget for
EvoControl — it can be found under the Smart Home category icon in
the widget gallery.
When the widget is opened, you'll see a grid starting with a LaunchPad button followed by tiles displaying the current readings from
all of your zones/DHW. These tiles are gesture-enabled to detect both single and double taps.
When you single-tap a tile, if you are using a HGI-80 then you'll briefly see the
demand-percentage for that zone (e.g. 🔥 30%) together with the zone's mode (e.g. Auto,
⏳ 22:50, ♾️). Without a HGI-80 that single-tap
will show the zone-mode but no demand info. You'll also see the next switchpoint time/SP inside
the SP frame with ↑, ↓, ↔ symbols to indicate the 'direction' of the next SP compared to the
current setpoint from a heat perspective (e.g. 22:00 ↓ 16°). The frame will reflect the colour of that next
SP.
If you double-tap, you can toggle between dropping a zone down to a 5° setpoint via a
TemporaryOverride until the next scheduled change (i.e. a sort of 'standby' just for that zone),
or toggle back 'up' to FollowSchedule mode for that zone. On the drop to 5°, the tile flashes blue
with a large ❄️ snowflake symbol. You'll then also see the next switchpoint momentarily in the setpoint box (e.g.
22:30 ↔ 16°). On the way back up to 'normal', the tile flashes orange with a large 🔥
flame symbol.
Double-tapping on the DHW tile will simply reverse the state from 'On' to 'Off or vice-versa. Be
careful when toggling to 'On' as it will stay on until the next scheduled 'Off' moment which may be quite a while in the
future and therefore be wasteful.
The double-tap behaviour can be changed via so-called Macros which can be accessed on the skill's Settings page. Here, for each zone you can
choose
an SP from 5°..35° or a delta (Δ) of ±6°. DHW may be ON or OFF. Also, instead of bounding things by the schedule, you can select a duration
from 0-24h in steps of 10 mins. In use on the Widget, every tile can behave differently — a single-tap shortly after the double-tap
will confirm the result of running the Macro.
On the widget's header, an icon with the current system modenest_eco_leaflocal_fire_department is always shown. A symbol with the number of zones calling for heat will
additionally appear when you have a HGI-80 in use, as will a symbol with
the aggregated boiler demand percentage. Any zones with heat-demand will have a thick white border
around the tile so that they stand out clearly, while any zones reported by the HGI-80 as needing attention will have a red
border to them.
Whenever TCC reports a fault via the API, a ⚠️ symbol will appear in the header. For zone/DHW faults,
you'll also see a ⚠️ icon on the offending tile(s). A single-tap on such a tile will then show either "🔋Low Battery",
"📡Comms Loss" or "⚡Sensor Fault" instead of the zone's mode. It's a good idea to consult your Evotouch panel or open the
skill and tap warning Show
Faults to drill down to the cause (see Diagnostics)
because e.g.
a TRV or CS92 with a low battery can interrupt regular radio communications
between Evohome devices to a surprising degree!
On the widget, the coloured SP-bars under the tiles do not show any ⌚ override icons/times the way
the tiles on the Skill dashboard do — as mentioned above, a tap is needed to reveal that information.
From time to time, the widget header may show "♻️ Update Available" to remind you that
removing/replacing the widget will immediately get you to the latest version without having to wait for Amazon's phased
rollout of updates.
Note that the Widget can launch the 'full' skill by tapping any part of its header/title area.
Gas Usage
If you are using a HGI-80 and your Smart Home system has access to a P1 Smart Meter connection, both
your today and total gas consumption can be displayed on a dedicated tile
which appears at the beginning of the tile-grid.
When using Domoticz, the device should be of type P1 Smart Meter and have
the name Gas or else a description field containing alias:gas;.
In the case of Home Assistant, you need to create a sensor with the name e.g. sensor.01_123456_gas. You should then define attributes where the value primary will appear in the upper section of the tile and secondary the lower. If
unit_of_measurement is omitted then the default is m3.
LaunchPad
Tapping LaunchPad will
take you to a second page of round buttons from which to trigger all your 'own'
activities plus some extra system-defined items. As a reminder, you can create custom scenes/activities by tapping
Scenes on the main skill dashboard followed by the New button.
In addition to your regular Standby activity, you'll
see one called Standby ♾️ which automatically applies PermanentOverride to this oft-used feature.
There's also a button named Reset which
sets the system mode to AutoWithReset (a setting the API supports but which is unavailable from your Evotouch panel).
Choosing it
effectively 'cancels' an activity by setting all zones to FollowSchedule. Just be mindful that it
inherently clears any PermanentOverride statuses assigned to zones/DHW.
Finally, there's a Baseline button
which returns all zones with a dynamically modified schedule to their most recent ABC preset.
If you don't tap any items on this grid then the widget automatically returns to the tile view after
8s. If you do tap any button here then it will flash several times before returning you again to the dashboard.
All custom icons assigned to your Scenes/Activities within the skill will automatically appear here
on the widget too. A reminder that these icons can be user-selected will be displayed (provided you have at least one
user-defined scene) until you have set a custom icon to prove you are aware of the feature.
Inherent Duration
If an activity name ends with 1-3 digits plus either an 'm' or apostrophe (shorthand for minutes)
then the activity in question will be activated for that particular duration in minutes via a TemporaryOverride.
There should be no space(s) between the digits and the m/'. Examples: HW Boost 20m, HW Boost
120', ShowerTime 15m. This only
applies when the activity is triggered from a widget or from the LaunchPad in the skill and not when triggered by voice.
XL Widget
If your Echo is XL-capable then a larger landscape widget automatically takes precedence over
the older portrait style (the so-called medium widget). Medium was the de-facto size when widgets were launched by
sliding to the left on the Echo homescreen, while Echos that support the widget-shortcut paradigm should all be
XL-friendly.
This makes much better use of the screen width of the Echo. The view is responsive to the number of
zones in your system and if you have fewer zones to show then the tiles will be bigger. In any case, it will all fit on a
single screen with no need to scroll. The XL widget includes the outside temperature in the header.
SysMode Dependency
Activities are normally not actionable when the System Mode is HeatingOff. You'll see this on the widget in the form of greyed-out activity names
and disabled buttons.
However, if you have DHW and the only item in an activity is Hot Water ON then this
can always be triggered during HeatingOff. In
Away mode, even DHW is blocked and only the
Reset option will be available to restore
Auto status.
Messages
Unlike the skill (which 'resides' only in the cloud and is not installed on your Echo), the widget is
actually installed on your device and also stores some limited data there. When you launch the widget, you'll momentarily
see that stored data until it is refreshed from the cloud with current values. If anything goes wrong during that refresh,
the widget will show a message telling you e.g. that TCC is offline or the skill's authorisation has expired (note that the
widget depends on the skill in the cloud to communicate with TCC under the hood). Also, due to a bug in the Echo's firmware, from time to
time the Echo can be too busy doing something else under the hood to accept widget-data. This is not the skill's fault.
Although widget code-updates are published from time to time, Amazon does not push them out to all users at
once but instead employs a staggered deployment which can actually span several weeks. For that reason, the widget will
inform you once that a newer version is available in case you'd like to manually update right now. To do that, just
remove the widget (not the skill!) and re-install it.
Note that Amazon does not allow widgets to provide spoken feedback and views them as a touch-only
paradigm.
Smart Home Integration
Charting, Demand & More
EvoControl can optionally communicate with Evohome through RF (Radio Frequency) and
either the open-source Domoticz or Home Assistant smart-home software packages. On your account dashboard there's a checkbox to indicate you
wish to use this feature with EvoControl.
You'll need to have an original Resideo HGI-80 hardware device or a clone such as the SSM or nanoCUL (we use the term HGI-80 throughout to universally
include the clones too). The HGI-80 monitors radio-traffic communication between your Evotouch panel and other Evohome
devices and this data can then be freely interpreted. Note that the non-RF web-API Evohome integrations in / are rejected by EvoControl because they don't
add much value over the use of TCC alone.
RF connectivity provides a parallel path for EvoControl to access data about your system that Resideo
does not (currently) expose via the TCC API:
Temperature readouts are accurate to 0.1° instead of 0.5°.
The % heat-demand per zone is reported and EvoControl indicates it in the opacity of the flame
symbol in each tile on the dashboard.
Any zones with an Open Window status will show .
Certain devices will not only report battery-low status but include the percentage too. This means you will
potentially see , , , , or icons
displayed.
Historical data comprising setpoints SP, a graphical schedule-depiction, plus
actual-temperatures from the previous 24h is available for each zone/DHW and can be plotted
on your Echo.
Real-time connectivity status or
towards / is always shown in the top right corner of EvoControl's dashboard.
Clicking on the icon will show a popup to explain the
reason for any error(s). Should any command via RF fail to complete, TCC is automatically used as a fallback data-source.
You'll see on dashboard tiles
which have had to fall back upon TCC because something was missing/unknown in the RF data. Bear in mind that when TCC is up
and running, all control inputs toward Evohome use the TCC API and the HGI-80 route is read-only. The HGI-80
is also never used for schedule-related matters, not even when reading data. Should you have any ongoing issues with
/ you can temporarily disable
using the HGI-80 via the toggle on the skill's Settings page.
Smart Home connectivity is unsupported when you have
more than one Location (Evotouch) associated with your TCC
account.
Charting
Access to 📈 graphical data can really help you to understand a room's thermal characteristics,
providing visual feedback on response times for setpoint-changes and e.g. how quickly temperatures drift naturally
over time due to thermal gain/loss. Those insights can help you plan the optimal schedule entries to achieve your
home-comfort goals while minimising energy use.
Unfortunately, Resideo does not store any historical temperature/SP data for Evohome, implying
that graphs
are unsupported without external means. Luckily for us, both
/ do archive values sourced from the HGI-80 and both have
mechanisms to retrieve 24h data via their respective APIs.
To view chart data in EvoControl, you simply double-tap on any tile on the main dashboard when a HGI-80 is active.
In addition to drawing SP and actual-temperature data, a plot of the Live
Schedule for the period is included for reference. You'll normally observe discrepancies between it and the
SP curve due to the advancement/delay effects of Evohome's optimum start/finish plus e.g.
any TemporaryOverrides you requested in that timeframe. If the system mode was Eco/Boost during
that period, you'd observe the SP plot showing temperatures shifted from the schedule plot by an
amount equal to your system's offset (usually 3°). This is clearly visible in the first 3 example images above.
Note that the schedule you'll see on the graphs is the current schedule for
the zone (retrieved at the moment of drawing the chart) superimposed on top of the historical
actual/SP data. If any schedule-edits or shifts were made in the last 24h or if you swapped out an ABC preset, the chart may not reflect the
schedule that was actually in effect over the past 24h when the other data was being stored by /.
If you tap on any of the caption text entries above the graphs (i.e. the labels
🟠 Actual, 🟢 Schedule, 🔵 Setpoint) then the plot for that particular curve toggles opacity
between 1.0 and 0.3 so that you can better compare overlapping portions of the 3 curves.
By default, the horizontal resolution is an impressive 5 minutes. The scaling on the y-axis is
dynamic and adjusts so as to show as much relevant detail as possible. A horizontal line shows the average temperature for
the period, while a vertical line is drawn through the lowest measured temperature of the past 24h.
Some example graphing-related commands:
"Alexa, open Smart Heat"…
Alexa, show the Bedroom graph
Alexa, next
Battery Status / % Demand
When you tap battery_unknown Battery on the
dashboard (only present with a HGI-80 in
use) — or whenever you ask Alexa either for a system-summary or ask if there is
demand — a screen will pop up showing the numerical demand-percentage values for each tile. The
opacity of the accompanying flame-symbols also reflect the percentages
. In an
appendage under each tile, the current battery-percentage of each zone's
sensor/actuator is reported. Any
mains-powered devices (e.g. BDR-91 relays) will show . Not all devices report battery as a
percentage — the HR92 does but e.g. the HR-80 and CS-92 only report Low/OK. Even those that handle percentage
only actually report 100%, 50%, or Low, so the granularity is unimpressive — this is an Evohome limitation
rather than EvoControl's.
TCC Offline Operation
With Domoticz, whenever TCC is offline the skill can operate
in degraded mode and still provide many useful voice/touch functions via your HGI-80:
A 👷 icon appears in the dashboard header when this mode is active.
All (constrained) change-setpoint and activate-activity commands are available, while anything
schedule-related is blocked.
The next block-time for an activity/scene becomes a fallback of 3 hours from now, since the real block time is
unknown. You may of course specify any valid until/duration/permanent to override this default.
You'll note the schedule ABC appendages that show the next switchpoint under each tile are
hidden.
In degraded mode, polling of Domoticz is hastened to occur every 10s instead of 30s.
If you change a setpoint without a constraint (i.e. block time rather than a specific until/duration), you'll see a ⏳
on the tile(s) until Domoticz returns the real duration-status from the HGI-80 (max. 10sec).
You cannot update your TCC configuration in degraded mode.
Skill preferences can be edited as normal.
As soon as TCC comes back online, full operation is automatically restored. TCC will just query your
Evotouch panel for whatever setpoints are 'live' when operation returns and take that as its status quo.
HGI-80 Setup Instructions
Note that this RF feature is only for technically-savvy
users with a smart-home setup. EvoControl works for 99% without doing any of this!
To enhance security, any parameters you will enter on the HGI-80 setup form will be validated in
our back-end to ensure the JSON response is from a valid HGI-80 instance. Our service provider's firewall blocks outgoing
cURL requests that are not on port 443 — hence the restriction that you must always expose on 443.
In order to enable communication with Domoticz, you will need to:
Have a working Evohome USB (for HGI/S80) configuration.
Set up a https connection towards Domoticz via a password-protected proxy such as apache, nginx or
ngrok. If you do not need to expose any other endpoints on port 443 then the normal Domoticz
external-access can be used without a proxy. A valid SSL certificate is a must (e.g. Amazon accepts LetsEncrypt
certs). Note that ngrok handles certs itself and issues a fixed domain name nowadays, even on free accounts.
Visit your Domoticz UI to enable 'Allow Basic-Auth authentication over plain HTTP (API only)' on the Setup →
Settings → Security tab.
Next, visit the Setup → Users tab and create a new Domoticz user with 'User' rights. Important: If using
a proxy, assign the same username and password to this user as you use with the proxy/ngrok. That way, the
basic-auth passes through in the http headers and satisfies both the proxy/ngrok and Domoticz!
Make sure to use 'Set Devices' to assign access to all your Evohome devices to this new user.
You'll also need to have defined a 'Thermostats' or 'EvoControl' room-plan in Domoticz which contains all your
thermostats zone/relay devices plus the Evotouch controller device and DHW if you have it.
For Home
Assistant, you will need to:
Have a working ramses_cc integration via HACS.
Provide a https proxy URL without password protection but instead with a long-lived access token.
You'll also need to provide the ID 01:123456 of your Evotouch (you can find this among your
HA entities as the controller ID).
On older versions of ramses_cc, all your TCC zones must have a climate.xxx equivalent
in HA and if you have DHW via TCC it must also be present in HA or you will receive an error message upon discovery.
Newer versions of ramses_cc will auto-configure.
Real Outside Temperature
For Domoticz,
you can include an Outdoor Temperature device (whether real or virtual)
called Outside or with the value alias: outside in the device description field. For Home Assistant, the device
should be called e.g. sensor.01_123456_outside (the ID should mirror the controller-ID) and be no
more chirpy than providing 200 data-points/24h.
EvoControl can use / data
to display graphs of the outdoor temperature during the previous 24h (just tap the
weather icon in the dashboard header or say "Alexa, show the Outside graph"). That header will then also show the current
outside temperature from your own sensor rather than the Resideo-supplied outside temperature for your location (if
you enabled that feature in settings). The weather forecast/prediction is always Resideo-sourced.
Gas Usage
If you are using a HGI-80 and your Smart Home system has access to a P1 Smart Meter connection, both
your today and total gas consumption can be displayed on a dedicated widget tile
which appears at the beginning of the tile-grid. It is not displayed on the main skill-dashboard but you can ask to have a barchart of gas
usage over the previous 24h drawn by saying "Alexa, show the gas graph".
When using Domoticz, the device should be of type P1 Smart Meter and have
the name Gas or else a description field containing alias:gas;.
In the case of Home Assistant, you need to create a sensor with the name e.g. sensor.01_123456_gas. You should then define attributes where the value primary will appear in the upper section of the tile and secondary the lower. If
unit_of_measurement is omitted then the default is m3.
Multiple Locations
Unite multiple Evohome Systems
EvoControl brings all your Evotouch panels together in a single place. When you have multiple
locations registered to your TCC Account, the bottom right of your dashboard footer will have a Location button which sequences through your locations every time it's pressed.
You'll see the currently-selected location e.g.
or in the header — incidentally,
tapping that icon will display the location's
friendly name from your TCC account. It doesn't matter if each Evotouch is situated at a different physical address (e.g.
Home, Chalet) or at the same address e.g. in a large home or office that required more than 12 zones.
Some example location-related commands:
"Alexa, open Smart Heat"…
Alexa, list my locations
Alexa, select location number 2
Alexa, what's the selected location?
Note that only one location can be active at a time — you cannot issue voice commands
addressing e.g. location while
location is displayed on your
dashboard.
Diagnostics
Real-Time Fault Reporting
Evohome makes use of radio-frequency (RF) communication between the various system
components such as your panel and the sensors/actuators around the house. To extend battery life as much as possible, most signals are only
sent every 4 minutes or so in pre-defined/synchronised time-windows, meaning non mains-powered devices are 'sleeping' in low-power mode most
of the time.
That's why setpoint changes from either the panel or from EvoControl can take a few minutes before a TRV actually opens or closes. You should
also be aware that the rather dated RF protocol in use is 'fire-and-forget' with no acklowledgement or error-checking mechanism to
request
retransmission of faulty data. This means that radio-interference can mysteriously result in commands being sent but never received, and there
will be no error-flag raised unless a device is not 'heard from' for a longer period. It's therefore wise to watch e.g. for
low-battery warnings because a device with a critical battery can cause quite some RF interference in a system and reduce overall reliability
considerably.
With EvoControl, whenever any faults are reported by Evohome, the dashboard will include a warning Show
Faults button in the botton right corner. Tapping it will list the currently-known faults with a description and a
timestamp. Unlike in the diagnostics menu on your Evotouch panel, this is not a persistent log — entries can appear
and
disappear from one skill session to another if the nature of a fault is fleeting. The log makes use of the following icons which
also appear
on the dashboard tile(s) individually:
Reflects a SensorLowBattery or ActuatorLowBattery status.
Indicates a SensorCommunicationLost or
ActuatorCommunicationLost issue. You will sometimes see
these faults popping up in your log for zones furthest from your Evotouch — they are often transient in nature
due to temporary comms-glitches.
Depicts a SensorFailure or ActuatorFailure issue.
Is shown when a zone is not
currently reporting its temperature. In that case, a red bar also appears in the zone header and a ❔ is shown instead of
the current temperature. This error can surface for e.g. a spare HR-92 that's still bound but has had its batteries
removed.
When using a HGI-80, any issues with reporting of either demand values or battery statuses via
Domoticz or Home Assistant will result in a on the corresponding tile(s) on the main
skill-dashboard or else a red border around the
tile on the widget. If you see this then consult your Domoticz or Home Assistant dashboard to troubleshoot. These issues are often a precursor to a future
panel/TCC warning that will show up after several days — knowing about them in advance will allow you to investigate the cause
early on.
Incidentally, you'll also see diagnostics information on the skill's widget. For starters, a ⚠️ symbol will appear
in the
header. For zone/DHW faults, you'll also see a ⚠️ icon on the offending tile(s). A single-tap on such a tile will then show
either "🔋Low Battery", "📡Comms Loss" or "⚡Sensor Fault" instead of the zone's mode.
Settings / Preferences
Configure Groups, Nicknames, etc
You enter this screen from the main dashboard by tapping the Settings icon (note this can only be done on Alexa-enabled devices with a rectangular
screen).
In the screen's footer there are 9 buttons:
Segments to edit the timespans for the Schedule Shifting
function
Live→ABC to copy an entire week's live schedule
to an ABC preset for 1-12 zones (plus DHW)
language_international Aliases to
specify English equivalents for non-English or heavily-abbreviated zone names
Offsets to fill in the blanks for EvoControl by specifying
Evotouch-parameters you may have changed but which are not retrievable via the API
linked_services Groups for
defining/browsing zone-groups for use either in the Setpoint Editor or in voice commands
Zone Order for setting the tile display order on
the main dashboard view and other tile-based views
ad_group_off Hide Tiles to specify
tiles to be hidden from normal view on the dashboard (they are shown any time Peek is toggled). When not revealing hidden tiles, the screen shows full-size tiles
for the others. When unhiding/peeking, all tiles are shown but everything is smaller so as to all fit on your device's
screen
Macros allow you to change the default double-tap behaviour of
tiles on the Widget. For each tile you can choose an SP from 5°..35° or a delta (Δ) of ±6°. DHW may be ON or OFF. Also, instead of bounding
things by the schedule, you can select a duration from 0-24h in steps of 10 mins.
Account to refresh the skill configuration if you
change something in your TCC account or e.g. add/remove a HGI-80 on your smartskills smartskills account
Make sure to visit the Offsets page to check
that the skill is correctly aligned with the settings on your Evotouch panel. The defaults have already been filled out but
it's good to check in case you changed anything. For example, EvoControl maps an AutoWithEcooffset from -3°…0° to nest_eco_leaf
while 0°…+3° is local_fire_department.
These icons are shown in the dashboard header (SysMode) but also e.g. on each tile next to the SP
instead of the non-differentiating € used by Resideo.
Preference-wise, there are 8 toggle-switches on the settings screen that allow you
to:
subheader Actual ° above Tile
Show/hide the coloured header-bar above each tile on the main
dashboard.
Trim Appendages Show/hide the
schedule appendage under each tile whenever no setpoint SP change
will actually result from that switchpoint being triggered. In other words, if the next SP is
the same as the current SP.
autoplay One-Shot → Session Keep the session open on an
Echo show after a one-shot
command. A one-shot is when the skill is not in-session and you invoke with a fully-executable command included in your
utterance. For example, "Alexa, ask Smart Heat to set the Livingroom to 20° for an hour". On a screenless Echo, the skill
will always auto-exit after the command is confirmed. On an Echo Show, you have the option here of also exiting or
alternatively automatically transitioning to a session (which will allow you to peruse the dashboard and issue more
commands without re-invoking).
Hints in Footer Show/Hide the usage hints in the dashboard
footer. The first few
(important) hints are always the same but thereafter they appear randomly to help you learn all the available
commands.
Enable a HGI-80 via Domoticz or HA If you have optionally
linked the skill to
use RF with a HGI-80 device
and Domoticz or Home Assistant, this toggle allows to
you disable the skill-connector while
troubleshooting.
Larger Tiles If you have more than 8 tiles to
display there's an option to make the
tiles larger so that they are easier to read. This will, however, necessitate scrolling in order to see >8 tiles.
Complementary to this is the Peek feature which allows
you to hide certain tiles unless a toggle on the main dashboard is tapped. Press ad_group_off Hide Tiles to select/de-select tiles for this feature.
partly_cloudy_day Show Local Weather EvoControl can
retrieve weather and 24h forecast data from the same
Resideo source that your Evotouch queries to show the outside temperature. To specify the location[1], this
uses the same ID format as the popular AccuWeather service. Note that the required ID is not your postal code — you
can
only find the correct ID to use by visiting the AccuWeather website from a browser. Enter your location (nearest city/town) in
the site's search box where it says Enter your Address, City or Zip Code and take note of the number you'll see in the URL of the
page you are redirected to. For example, specifying London UK as your city results in
https://www.accuweather.com/en/gb/london/ec4a-2/weather-forecast/328328. In that case, 328328 would be the ID to use with
EvoControl.
Once you have entered your ID(s) in the skill, the Dashboard header will show a weather icon and the current outside
temperature at your location(s). You'll be able to ask "Alexa, what's the forecast?" or "Alexa, show the forecast" (for a
graph/plot) and per zone you'll be able to plot the ΔT
24h between the expected outside temperature and the schedule
for the next 24h for each of your zones — the wider the gap, the more energy your heating system will need to
use. The weather icons will look like these:
Note that EvoControl polls the weather service at most 1x per 15 minutes.
Brief %-demand feedback When you ask if there is
demand on a screenless Echo, the
response can be quite long as the demand percentages for several zones can be enunciated by Alexa. On a device
with a screen, that's not needed. This setting shortens the spoken feedback to just a zone-count number and no
specific percentages.
Under the slider switches are 3 form fields where you can enter the nicknames for your
ABC schedules using an on-screen keyboard. These will then appear in the headers on the various
schedule screens to jog your memory as to what each preset represents.
The screen's footer shows your current Default zone if you assigned one using the e.g. "Alexa,
the default zone is the Livingroom" command.
[1] Note that if you have multiple Locations
in your TCC account, the ID will need to be entered for each location, even if your panels are all at the same physical
address and are merely part of a large installation. Select each location in turn on the main dashboard via the
Location button and immediately revisit the
settings page to see the per-location setting.
Zone Sort Order
Choose your preferred arrangement
This screen (which is reached by pressing Zone Order in
the Settings screen) allows you to select the sort-order for
zone-tiles as
displayed on the main dashboard (incidentally, also in the setpoint-editor, the scenes-editor and the groups-editor).
When you tap any desired tile in the bottom row (unset) it is moved to the top row (set) as the next
item. Tapping a top-row item moves it back down to the unset row. When all the tiles are set then the Save button is enabled and the sort-order can be saved.
Hitting the back arrow in the top-left corner of the screen
will abandon the entire edit-session without saving it.
Aliases
International Zone Names
If your native spoken language is not supported by Alexa, it's likely that you will use either
British or American English as the language setting on your Echo(s). However, the zone names as displayed on your
Evotouch — and therefore reported by TCC to the skill — are most likely to be in your native
language, meaning Alexa will not understand them in spoken commands (they'll be fine for touch-activated commands on the
Widget or the skill-UI).
On the Settings page, you'll find a
button language_international Aliases that
will open the Alias Editor. Here you can define and save a 1:1 mapping from your native zone names to English
language equivalents. The names you provide are your choice and do not even have to translate correctly, as long as they
are understandable room names in English you're good to go! Note that DHW is always called Hot Water and cannot be assigned
to.
The concept can also be useful if your zone names are already in English but e.g. strongly
abbreviated so that fuzzy-matching a zone name fails. In that case, you can define an alias for just that zone with
the name spelled out in full for Alexa to comprehend.
Whenever you define one or more aliases, your Activities/Scenes and Groups are automatically adjusted
to reflect the aliased name so no manual editing is required.
Example Commands
So many ways to say a command…
Whenever you either tap the Help button on
the main dashboard or say "Alexa, help" when the
skill is in-session, a scrollable list of example commands is displayed. Note that the
help_center
Help buttons on screens other than the dashboard show topic-specific clues
for the function at hand.
System Mode
Set the system mode to 'Auto'
Set the heating mode to 'Economy' until 9 PM
Set the system to 'Boost' for 30 minutes
Set the heating mode to 'Away', ending
Set the system mode to 'Day-Off' for 2 days
Set the system mode to 'Custom'
Set the heating to 'Frost Protection' (Off)
Reset the system mode
What's the system mode?
Zone Control
Set the Office to 20.5°
Make it 19° here
Make it 20° in the Livingroom & Kitchen
Set the TV Room to 18° until 2 PM
Undo → undoes an override if you got the zone name or temperature
wrong
Set the Lounge to 22° for 40 minutes
Set the Garage to 10° permanently
Raise the whole house by 1° for an hour
Lower the Office by 0.5°
Reduce the whole house by 1° for half an hour
Return the Bedroom to follow-schedule
Cancel the Bathroom override
Query
What's the Cinema temperature?
Tell me the Bedroom setpoint
Show the Livingroom schedule
What's the average temperature?
What's the coldest room?
What's the warmest zone?
Is there heat-demand?
What's the Studio climate?
What's the Outside temperature?
What's the forecast?
Give me a system summary
Show today's roster
What's next for the Office?
What's the Hot Water state?
What's today's gas consumption?
Schedule
Show the Livingroom schedule
Make it 19° at 4 PM
Make it 18° at 5 PM for 45 mins
Make it 17° at 8 PM until 21:30
Make it 22° in the Bedroom at 11 PM
Undo → removes a verbally-added switchpoint
Upload schedule A in the Study
Restore schedule B in the Bathroom and Bedroom
Go back to schedule C everywhere. Note that this includes DHW, if relevant.
Schedule Shifting
Start my day tomorrow at 6AM
I'm going to bed at 10PM
My lunch break tomorrow starts at 1PM
Dinner today will be at 17:00
Sidestep my lunch break tomorrow
Increase suppertime temperatures by 1°
Lower bedtime temperatures by 2°
Delay going to bed today by half an hour
Advance lunchtime tomorrow by one hour
Defer waking up tomorrow by 30 mins
Revert to baseline
Undo → reverts a schedule shift
What time is bedtime today?
When is lunchtime?
When is supper?
What time is wake-up tomorrow?
Schedule Compress/Expand
Extend bedtime by 15 mins
Shorten lunchtime by 15 mins
Scenes/Activities
Show activities
Activate 'MovieTime'
Undo → undoes an accidentally-wrong activity-activation
Activate 'Boost Upstairs' for 20 minutes
Trigger 'Watch TV' until 9 PM
Start 'Cooking' for 30 minutes
Activate 'Standby' permanently
Schedule 'GoodNight' for 10PM
Schedule 'Studying' from 4PM until 6:30PM
Schedule 'Workout' starting at 2PM for 1 hour
List my activities
Groups
Set the Kids Rooms to 20°
Set the Bedrooms Group to 21° for 30 mins
Increase the Upstairs Rooms by 0.5° until 11PM
Set the Cellar Group to 10° permanently
Lower the Downstairs Group by 1°
Upload schedule A in the Bedrooms Group
List my groups
Show the group-creator
Domestic Hot water
Turn off Hot Water
Turn on Hot Water for 20 mins
Turn on Hot Water at 5PM for 45mins
Turn on Hot Water at 10PM until 11:30PM
Show the Hot Water schedule
Upload schedule B for Hot Water
What's the Hot Water state?
Multiple Locations
List my locations
Select location number 2
What's the selected location?
Miscellaneous
Update my configuration
The default zone is the 'Lounge'
Delete the default zone
What's the default zone?
Show the forecast
Help
Go Back
Repeat
Say that again?
Cancel
What's new?
Screenless
Uncomplicated ease-of-use
The myriad of features in EvoControl Smart Heat have been designed in a way that you can just ignore
the ones you don't want to use and keep things uncomplicated. That's the beauty of voice control — there's zero
UI-clutter!
If all you have is e.g. a screenless Echo Dot device or the Alexa app on a tablet/phone, all of the
intuitive constrained-override commands are still available and require no setup. They're the ones that help save
money and raise comfort by allowing you to specify an until/duration for overrides both to setpoints and the system
mode:
Set the heating mode to 'Economy' until 9 PM
Set the system to 'Boost' for 30 minutes
Set the TV Room & Playroom to 18° until 9 PM
Set the Bathroom to 22° for 20 minutes
Raise the whole house by 1° for an hour
Reduce the whole house by 1° until 5PM
It goes without saying that all the query commands work too, so you can ask if there is heat
demand or what's next for the system.
If you also own an Echo Show and have set up the likes of Scenes/Activities, Groups,
schedule-shifting targets, and/or Multiple Schedules, all of the commands for using these features work perfectly on
screenless devices in other rooms — the touchscreen is only needed to set them up, not to use
them!
Usage Tips
Some useful Pointers
First off, you don't install EvoControl on a device such as an individual Echo but instead set it up it inside your
Amazon
account so that it's automatically available on all your Echos, including any new ones you may add to your arsenal in the future.
EvoControl is a so-called custom skill, which means its voice-model is not based on one of the
pre-defined templates from Amazon. Instead, hundreds of syntactic variations of all the commands have been handcrafted into a full-custom
voice model specifically written just for this skill. Because it's not a so-called (in Amazon's parlance)
smart-home skill, your thermostats won't appear in the Alexa app as devices — if you do see them there
it's because you also have the standard Resideo TCC skill enabled. While EvoControl and the TCC skill can co-exist you should have no need
whatsoever for the standard TCC skill when EvoControl is in use.
Every time you use any custom skill by voice, you have to initially invoke it by name. For EvoControl you
just say any of "Alexa, open Smart Heat" or "Launch Smart Heat" or "Start
Smart Heat" because the skill's invocation name is "Smart Heat". Amazon requires the use of 2 words at a minimum and it transpired that Alexa
had difficulty understanding 'Evo Control' (because Evo can be pronounced as 'eve-oh' or as 'evvo') so Smart Heat it was!.
On Fire TV and Fire Tablet devices, you need to add the word "skill" to the command: "Alexa, open
(the) Smart Heat skill".
One-shot vs Session
We can differentiate between one-shot and session invocation — how they
behave depends on whether your Alexa-enabled device has a display or not:
With a one-shot, while Alexa is idle you say something like e.g. Alexa, tell Smart Heat to set the system mode to
Auto or Alexa, ask Smart Heat if there's heat demand. It's called a one-shot because it will just execute a
single command and then the skill will exit. You could subsequently issue another one-shot or e.g. ask Alexa for the
weather. Without a screen, the skill will always exit but if you have a display then there's a user-preference in the
skill-settings to automatically transition EvoControl to session-mode after handling a one-shot.
To deliberately start a session, while Alexa is idle you say Alexa, open/start/launch Smart Heat. Note that on
a Fire Tablet in 'Show' Mode, you need to add the word 'skill' as otherwise the Tablet will look for Android apps instead
of skills — it's then "Alexa, open Smart Heat SKILL". After the beep you can now issue back-to-back commands
without first having to say the Alexa, ask Smart Heat… part each time. For example, Alexa, set
the system mode to Auto or Alexa, is there heat demand?.
Remember that while you're inside a session, Alexa only handles commands intended for this skill so
if e.g. you ask for the weather while a session is active, you'll get an error that "EvoControl cannot help you with
that".
Confirmation
Note that each time EvoControl sends commands to the TCC cloud it looks for a confirmation message
from Resideo. If that confirmation is missing because e.g. the TCC service is temporarily offline, you'll be told to verify
things on your Evotouch. If you launch the skill while TCC is offline you'll be told so and a link will be shown on your
Echo's display to a Resideo page to check for when it returns to service.
Undo
The Undo command is context-sensitive and can:
Undo a switchpoint-insertion when editing schedules by voice. If you say e.g. "Alexa, make it 20° in the Kitchen at 5
PM" and realise you meant the Bathroom and not the Kitchen, say "Alexa, undo" (and then of course issue the correct
command).
Revert things after a TemporaryOverride command. If you say e.g. "Alexa, set the Office to
20° until 5 PM" and realise you meant the Kitchen and not the Office, say "Alexa, undo" (and then of course issue the
correct command). This also works for multiple zones or Groups.
Revert things after incorrect scene/activity activation. If you say e.g. "Alexa, activate WatchTV" and realise you
really meant to activate "GoodNight", say "Alexa, undo" (and then of course issue the correct command).
Undo a schedule-shift delay/advance.
Zone Name Matching
EvoControl uses fuzzy-matching to match your zone names as spelled for TCC against Alexa's
expected spelling thereof. If you have a TCC zone called 'Master Bedrm' or 'Mstr Bedrm', Alexa will hear 'Master Bedroom'
when you wish to address it by voice. Thanks to the fuzzy matching, the correct zone will still be addressed (it does
depend to some extent on how 'close' your other zone names are). There should therefore be no need to rename your TCC zones
to work with EvoControl.
If any of your zones have blank names (e.g. from a bound but spare HR-92) then they will be skipped
over during discovery. The skill refers to these as ghost zones. If you cannot identify the source of your ghosts,
the issue is probably an anomaly that incidentally occurs on Resideo's end. Login to your TCC account, select your location
and delete it. Then re-add it and the ghosts should be gone.
Sometimes, after making a call to Resideo technical support (for whatever reason), Resideo will
completely reset your TCC account. This has the side-effect of reassigning your SystemID and/or ZoneIDs which unfortunately
invalidates the oauth token you were assigned when you first linked the skill. If this happens, the skill will
recognise the change and inform you that a re-auth from your Account
Dashboard will need to be performed.
Alexa Routines
If you wish to have the skill automatically revert to baseline every day at (say) just after
midnight, you can create a custom routine via the Alexa app to do something like this:
Just open the Alexa app
and go to routines. Then hit to create a new routine. Under WHEN hit the for Add an Event, choosing
Schedule and subsequently At Time. Choose the time of day at which
the routine should run. Next, under ALEXA WILL hit the
for Add an Action and choose Customised. Under
Enter what you would ask Alexa,
type ask smart heat to revert to baseline. Then hit Next and finally, Save. You
can choose any of your Echos or the mobile device on which you have the Alexa app as the device
from which Alexa will respond.
Just be mindful that any schedule-shifting applying to 'tomorrow' will be negated by this routine. If
you regularly specify tomorrow-shifts, perhaps run this routine only on Sundays e.g. at 8PM to clean things up for the upcoming week yet still
allow you to shift Monday morning if you'd like to.
Round Connected Thermostat
EvoControl additionally supports the Round Connected thermostat, which like Evohome makes use
of Resideo's TCC behind the scenes for smartphone control and schedule setup. When you first link the skill, if a Round is
discovered then things will auto-configure accordingly (for example, the Round only supports 4 system modes instead of
7).
You may wonder what the point of EvoControl is for a thermostat with only a single zone, but the
Multiple Schedules, Schedule Shifting, Graphing/Charting and Constrained Overrides in EvoControl all work perfectly well
and are extremely useful enhancements.
The Activities/Scenes and Groups paradigms are disabled for the Round as they are not appropriate in
the absence of multiple zones.
Backup & Restore
Note that you can backup and restore the skill configuration from your smartskills
Account Dashboard. This facilitates keeping a
library of subtly different settings and swapping them out at will. The how-to is here.
EvoControl WebForm
Thank you for your message. A copy has been sent to your email address. We'll get back to you as soon as possible with a
response!
 "Alexa,
open Smart Heat" and you're up and running!
"Alexa,
open Smart Heat" and you're up and running!

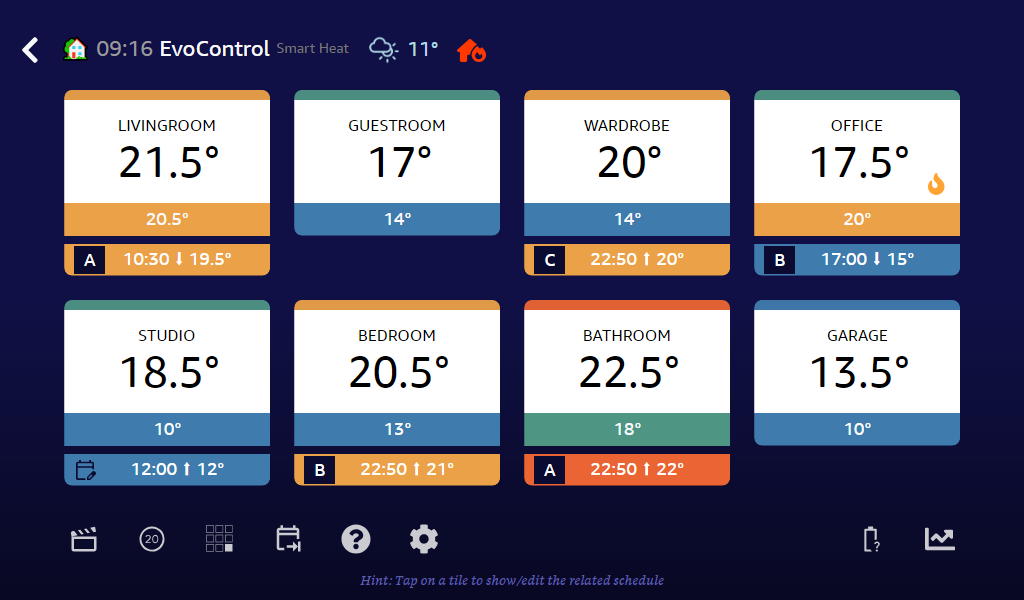
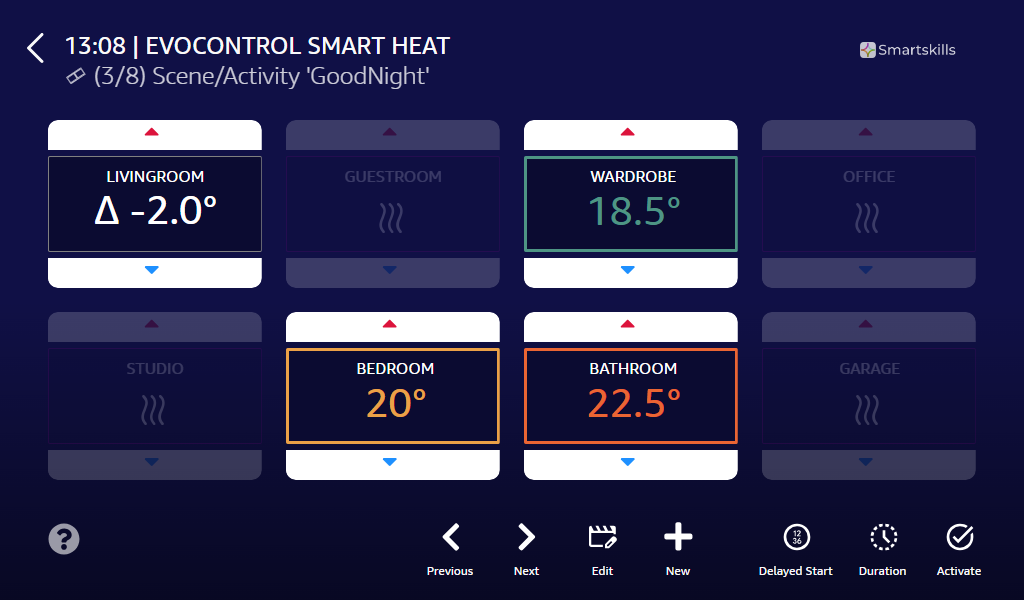

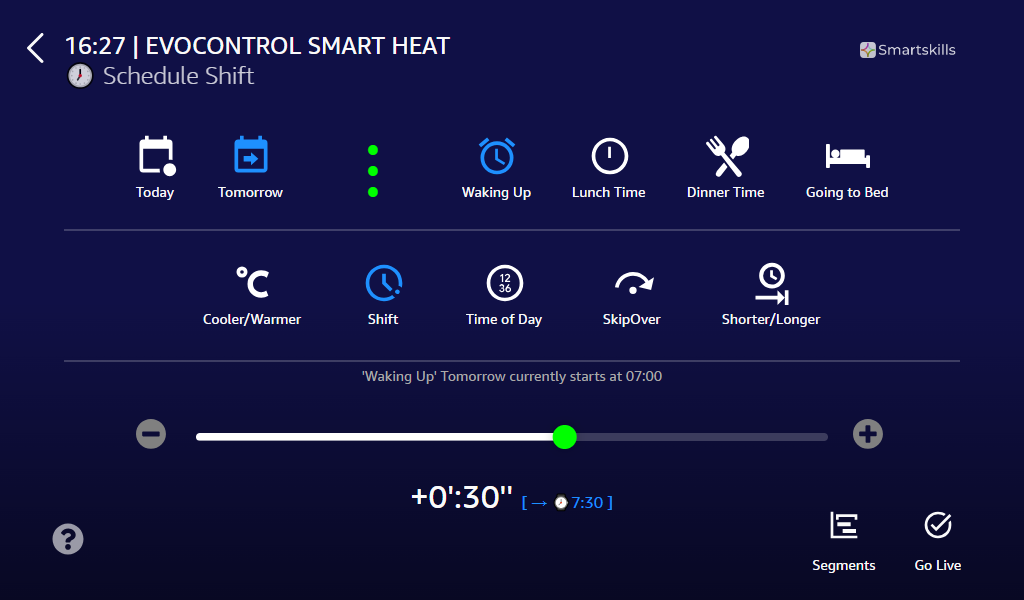
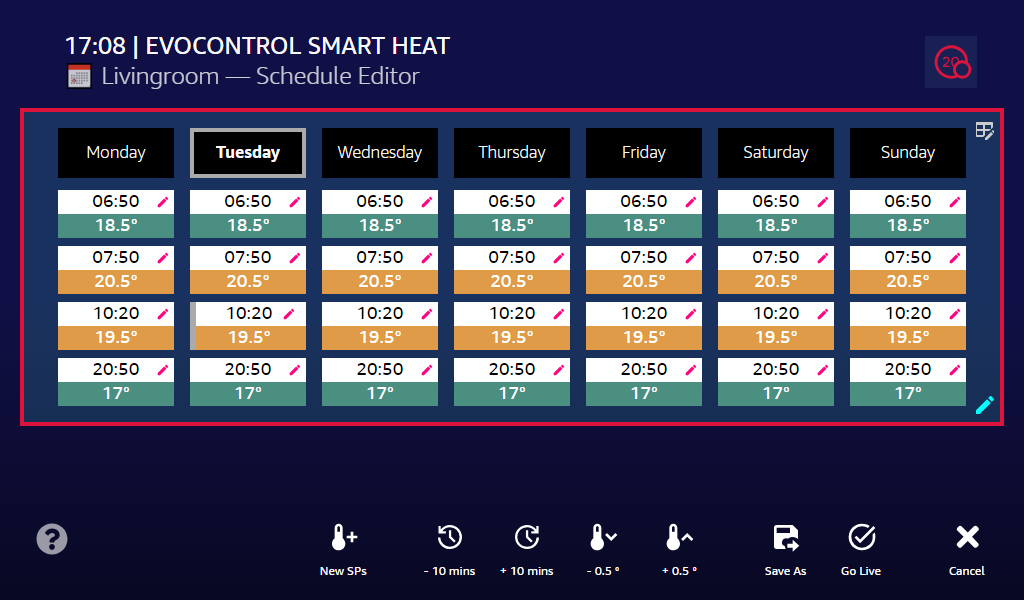
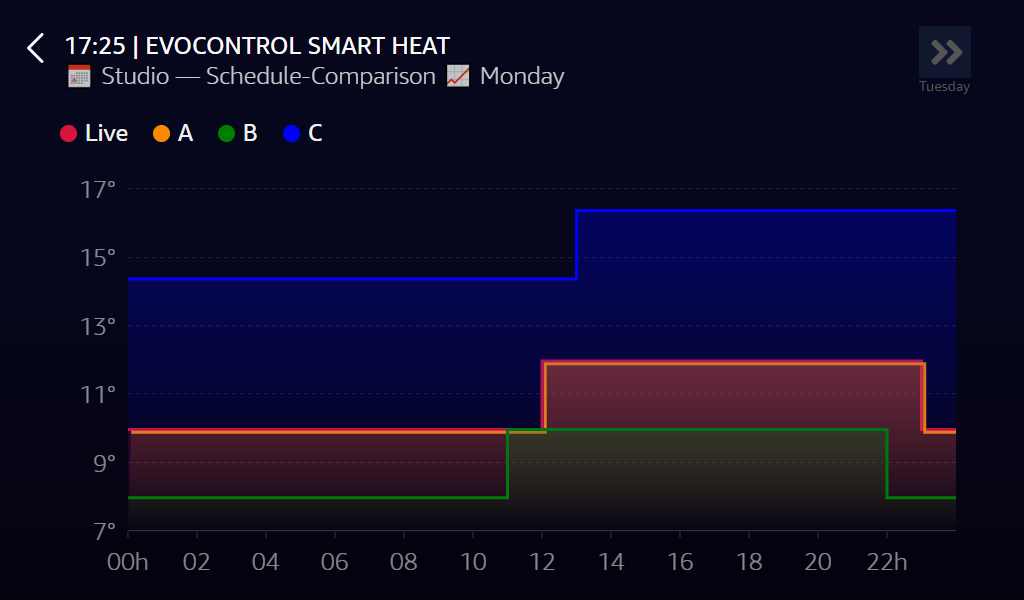
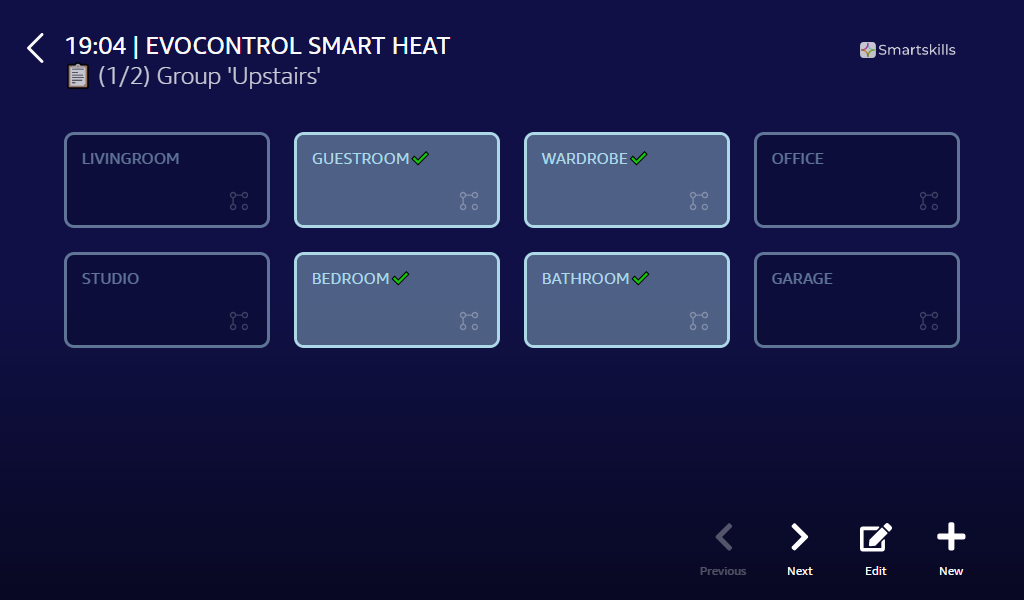
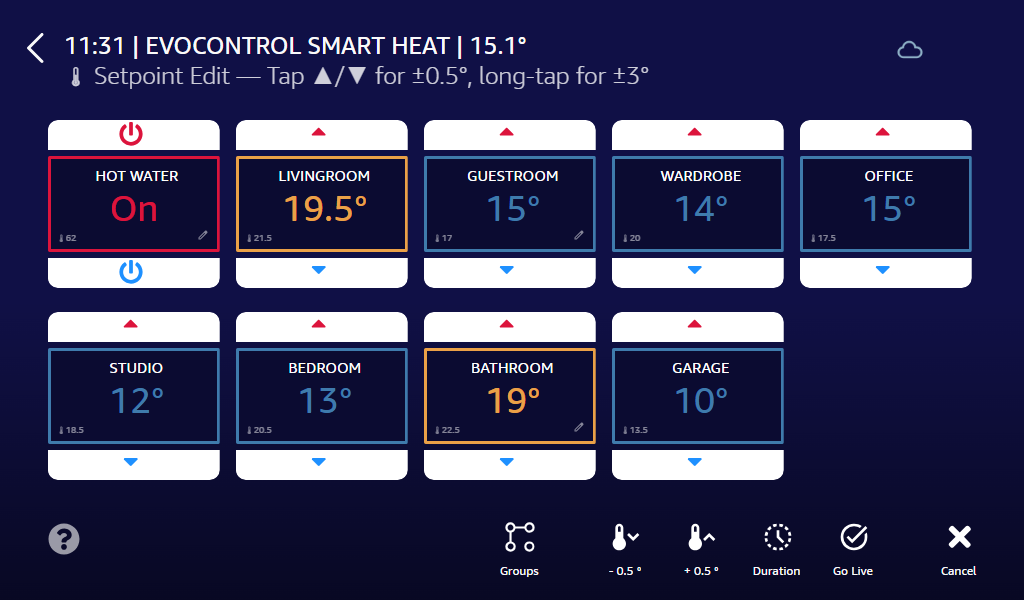
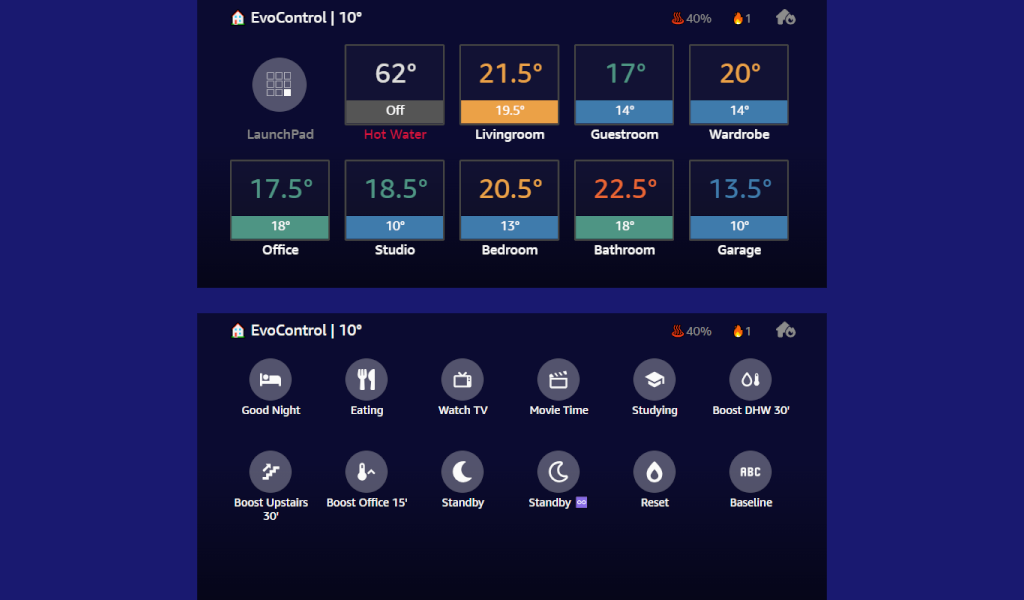
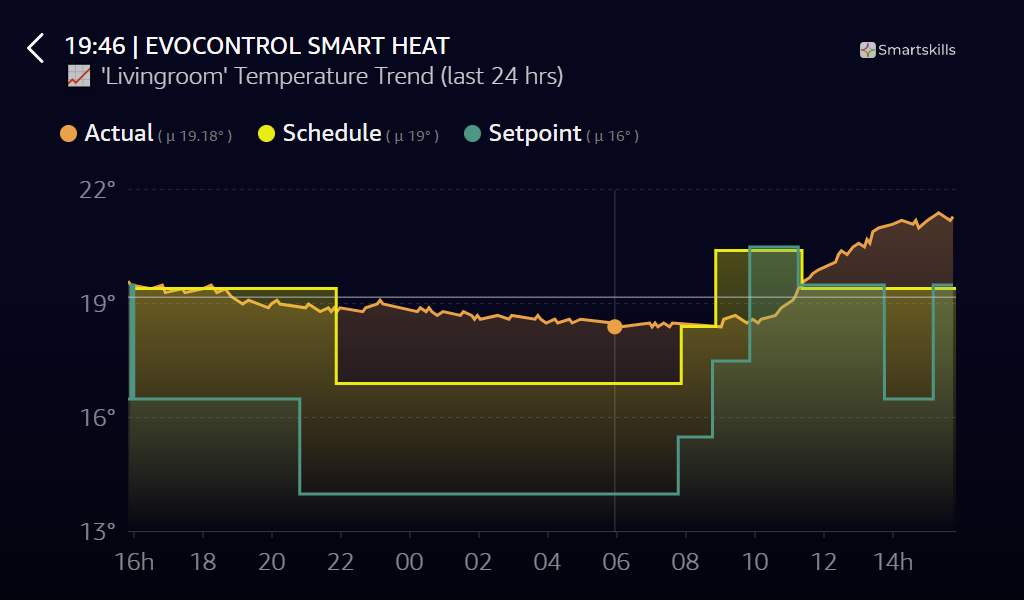
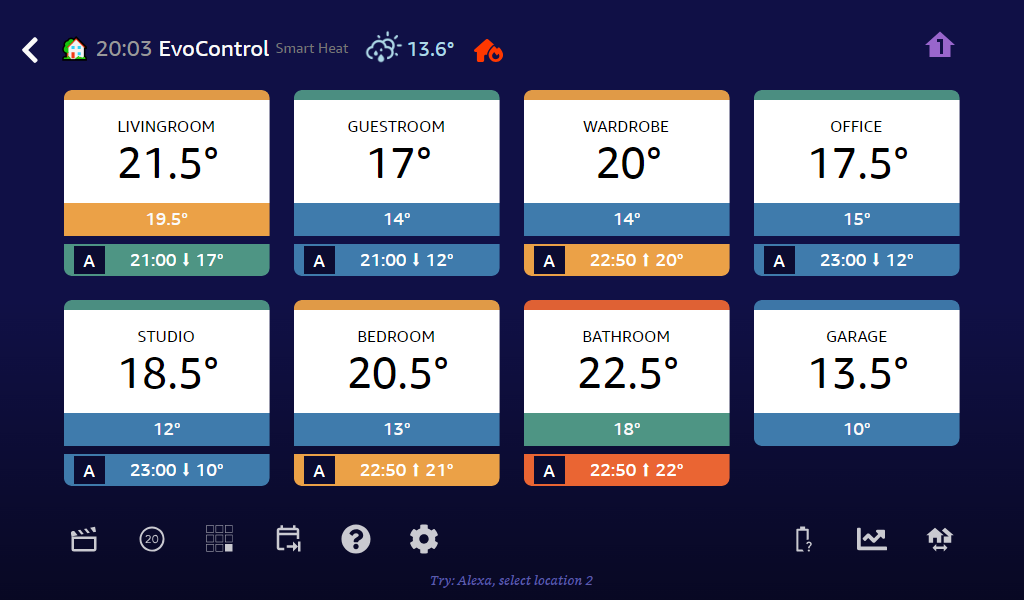
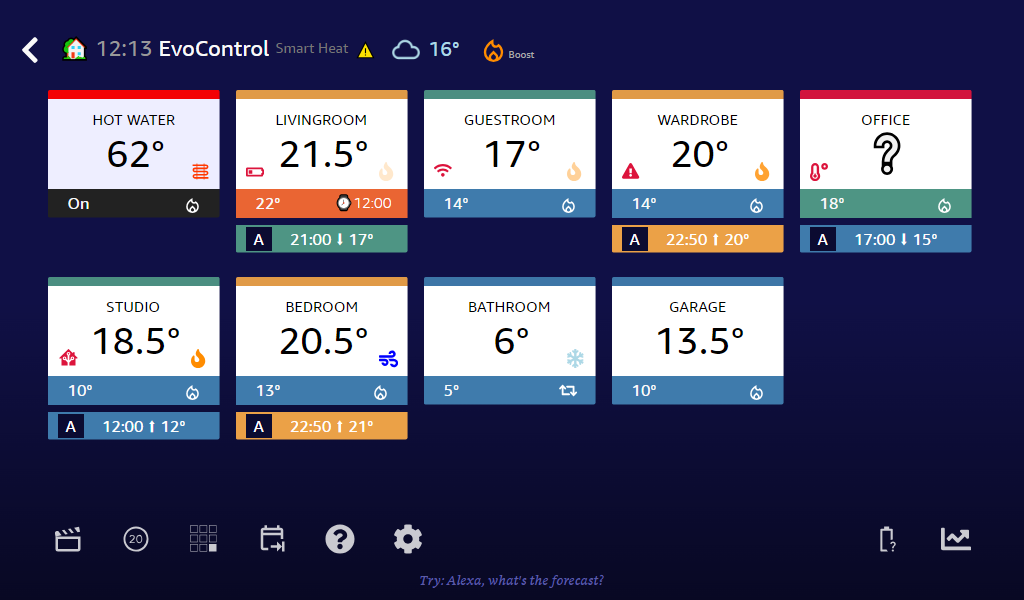
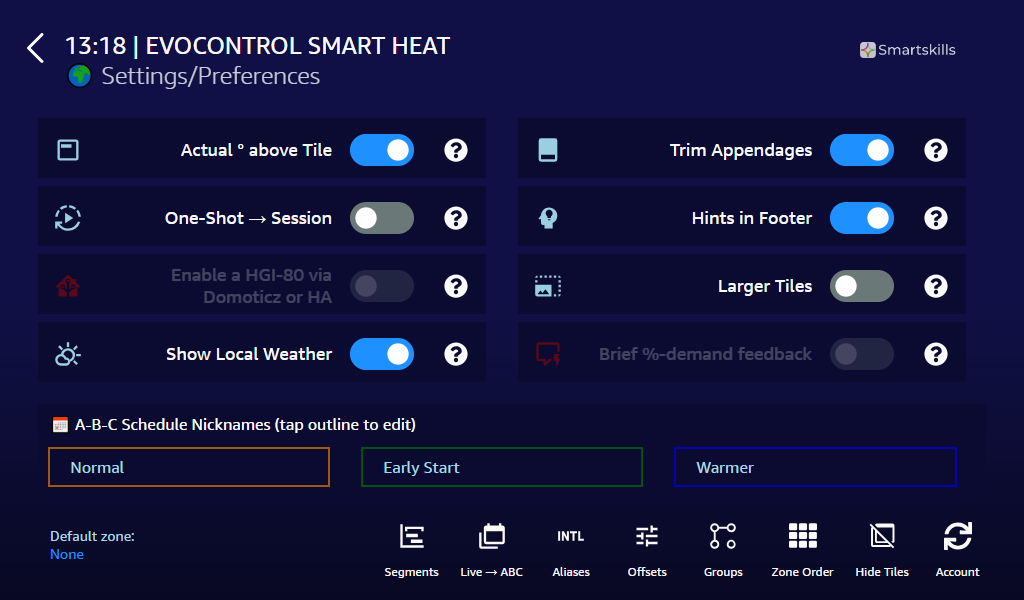
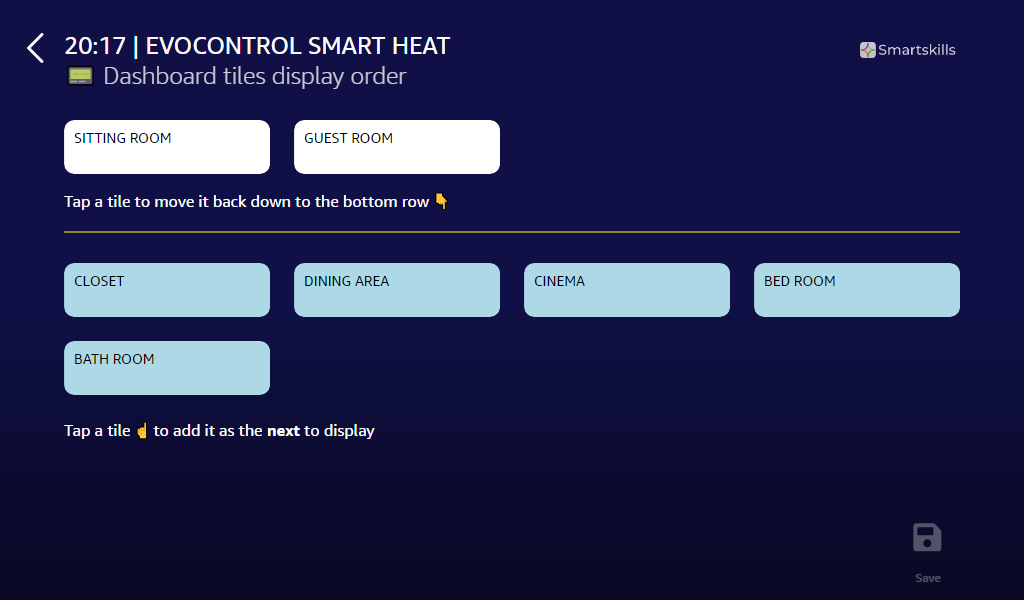
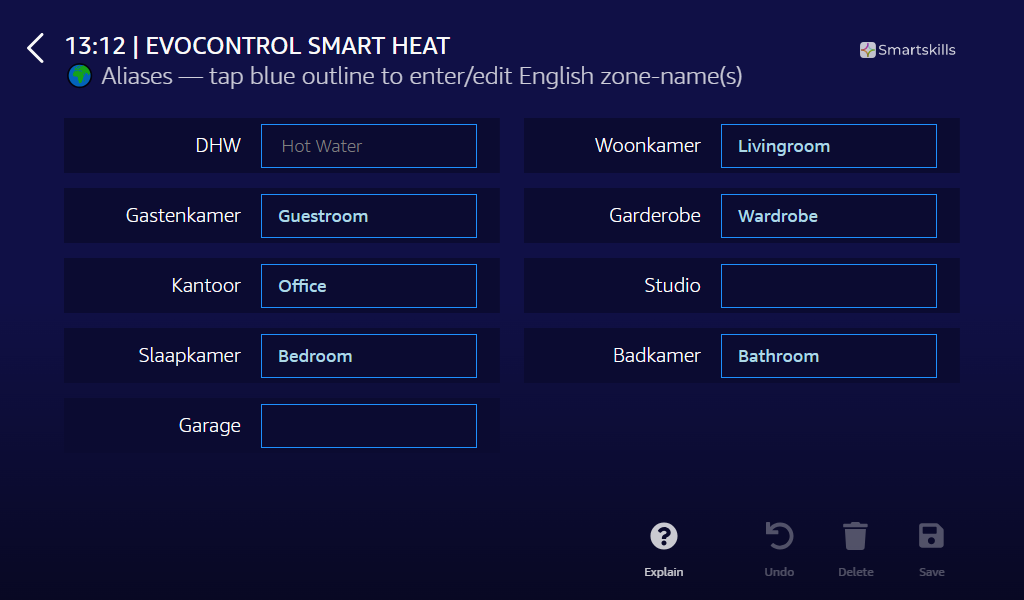
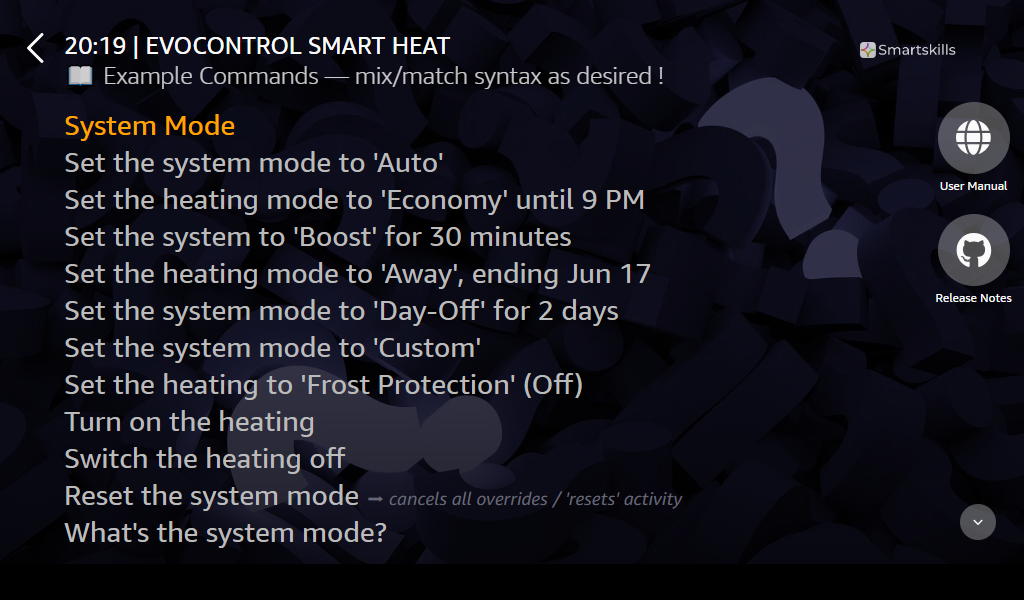


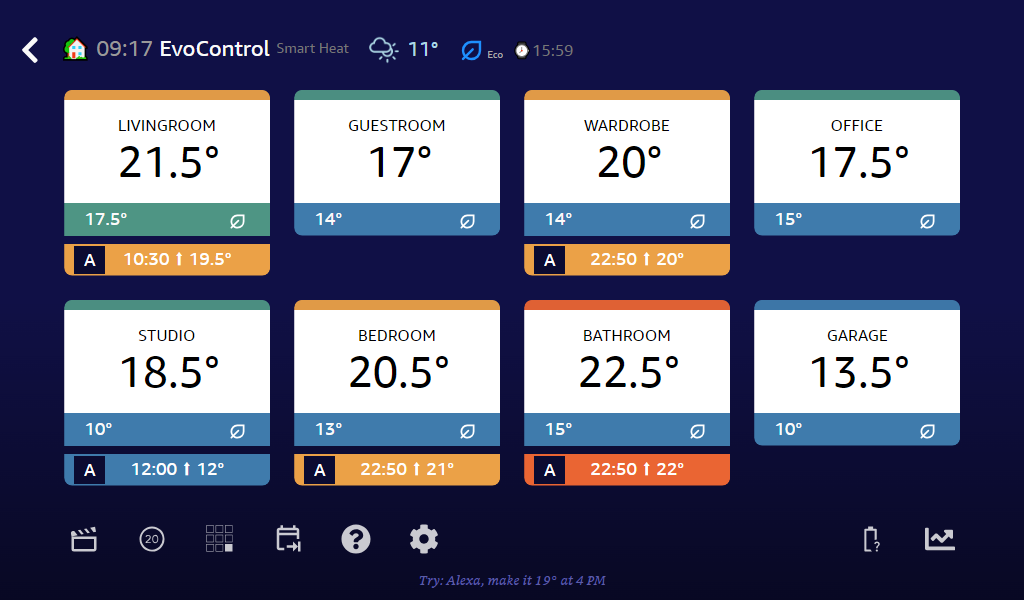
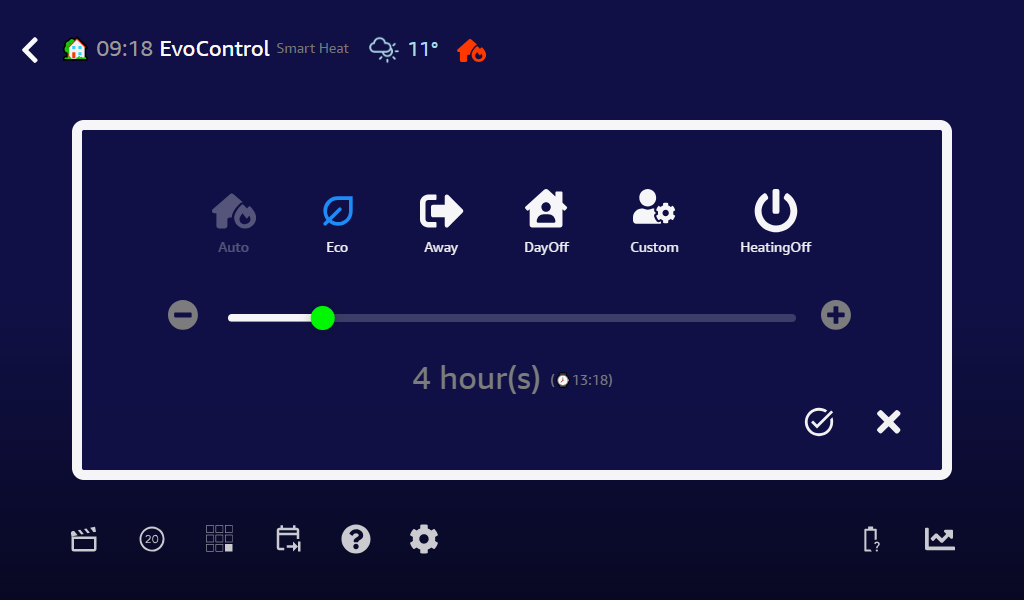
 flanked by the outside temperature.
You'll also see the System Mode as an icon
flanked by the outside temperature.
You'll also see the System Mode as an icon
 in a small header-bar.
 What's visually
different to your Evotouch is the colour-coded appendage under each zone. It identifies the currently-active
What's visually
different to your Evotouch is the colour-coded appendage under each zone. It identifies the currently-active
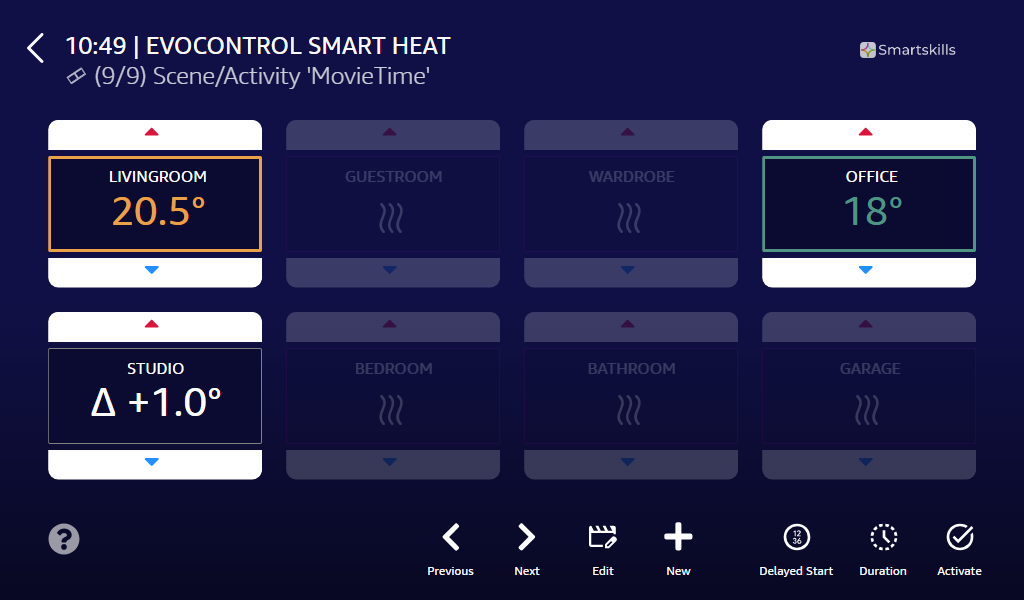
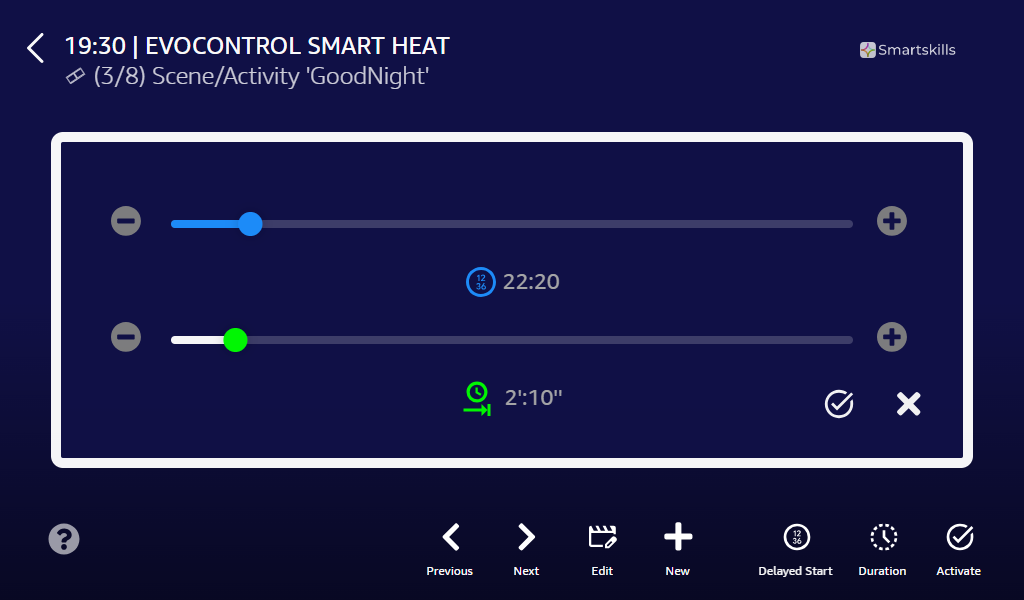
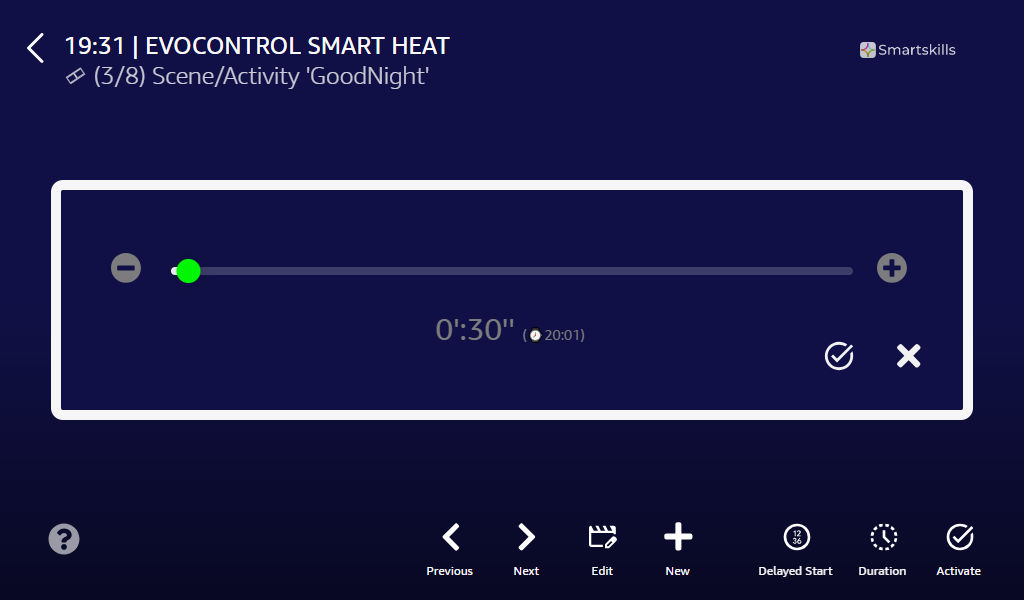
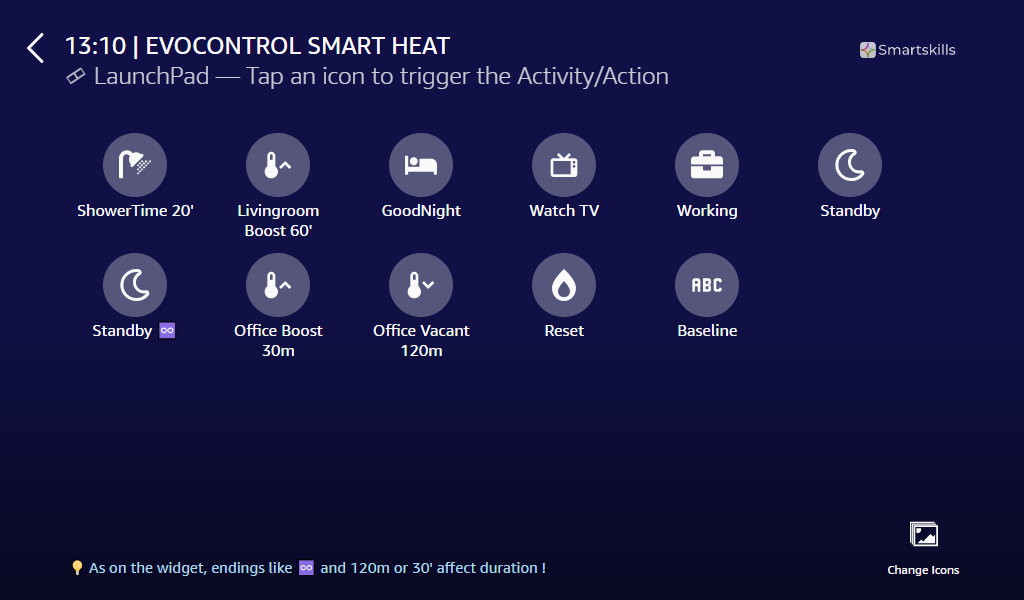
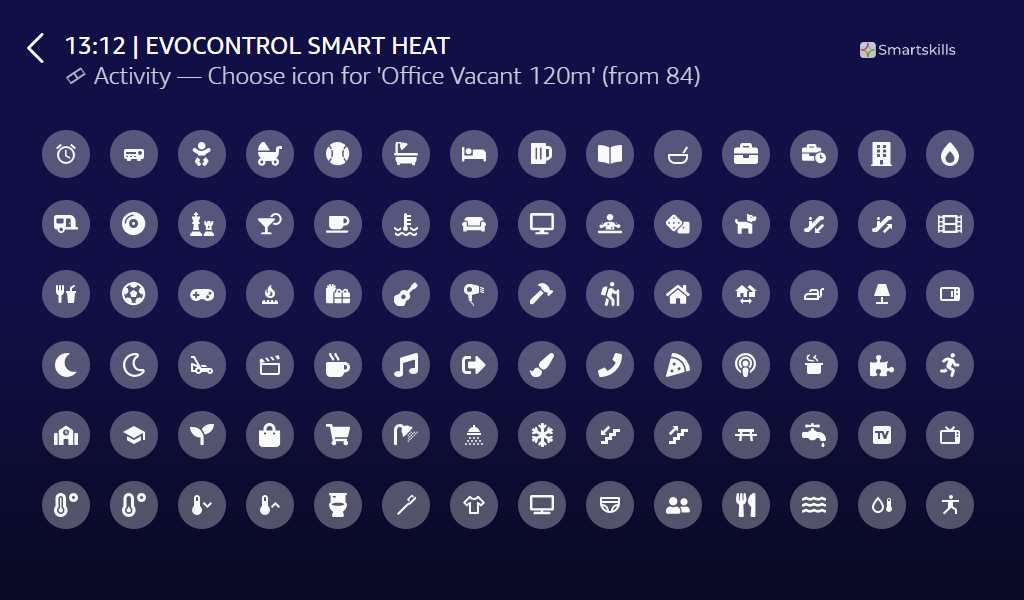
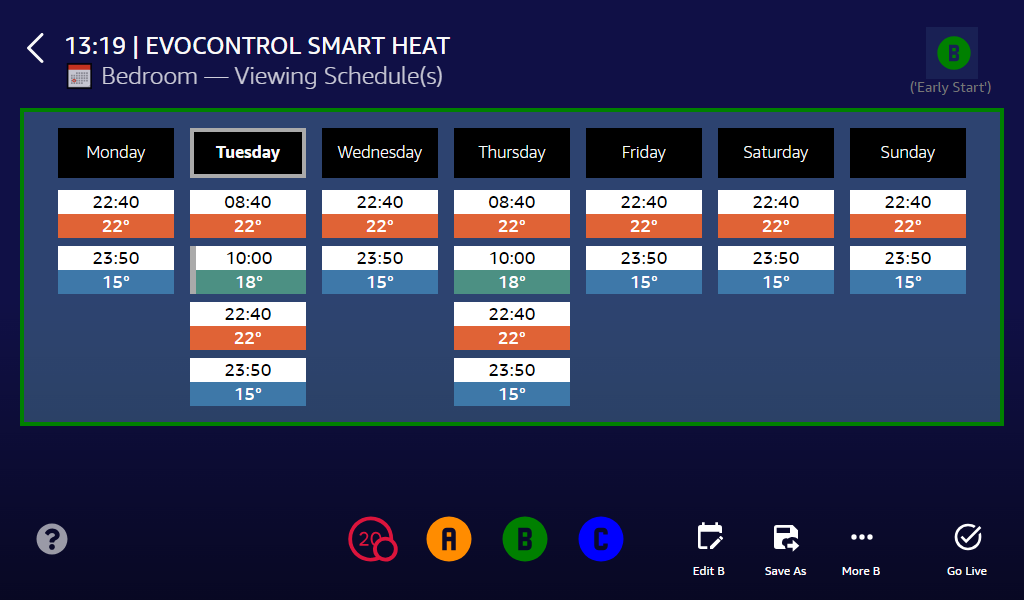
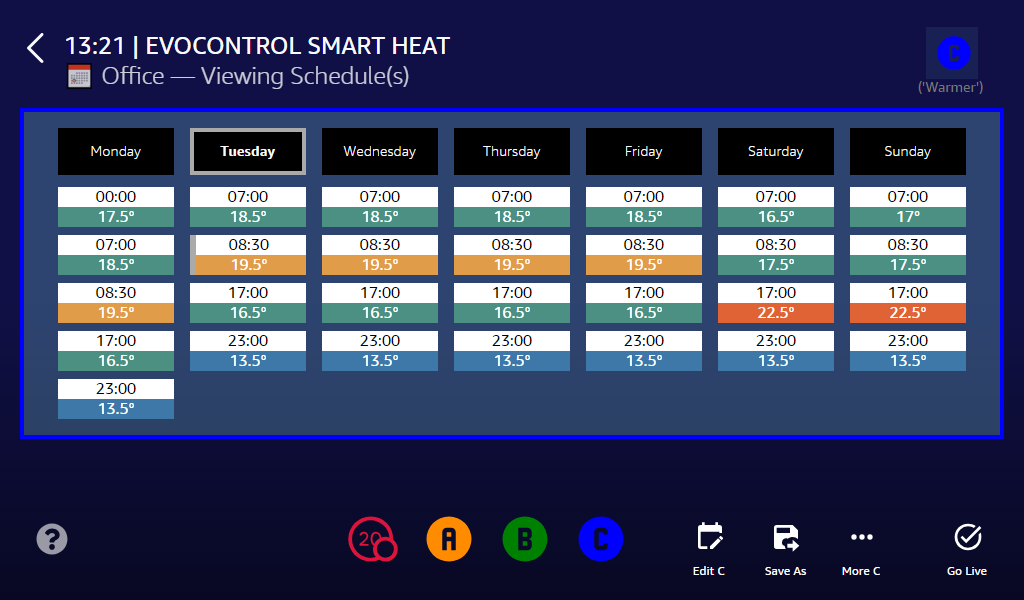

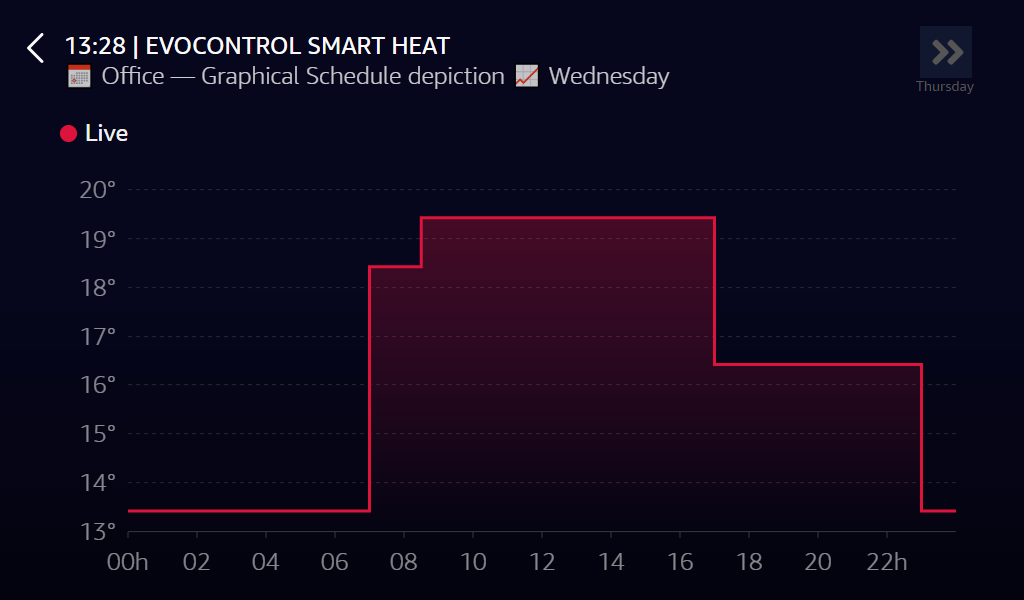
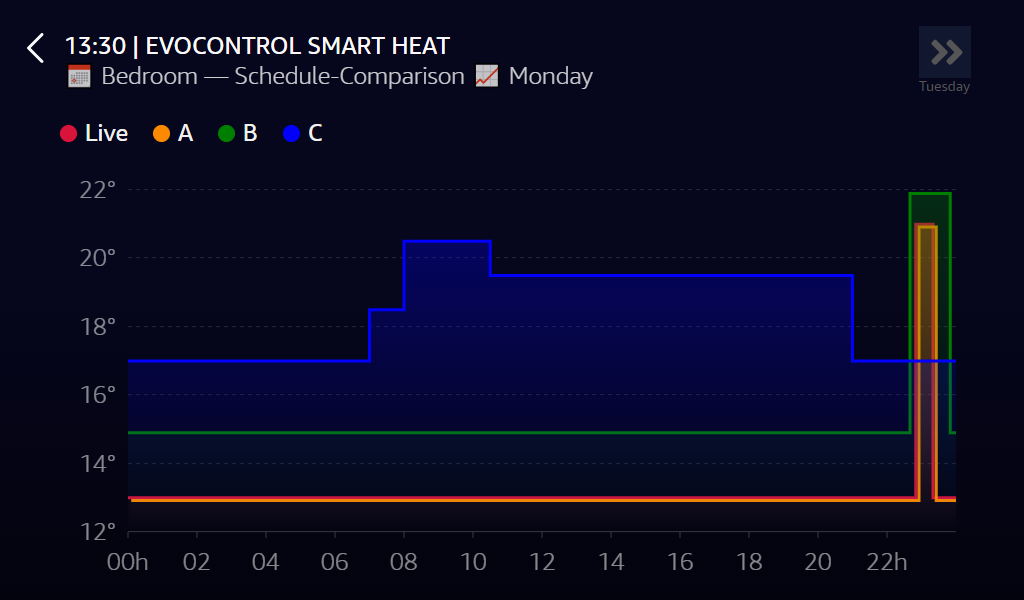
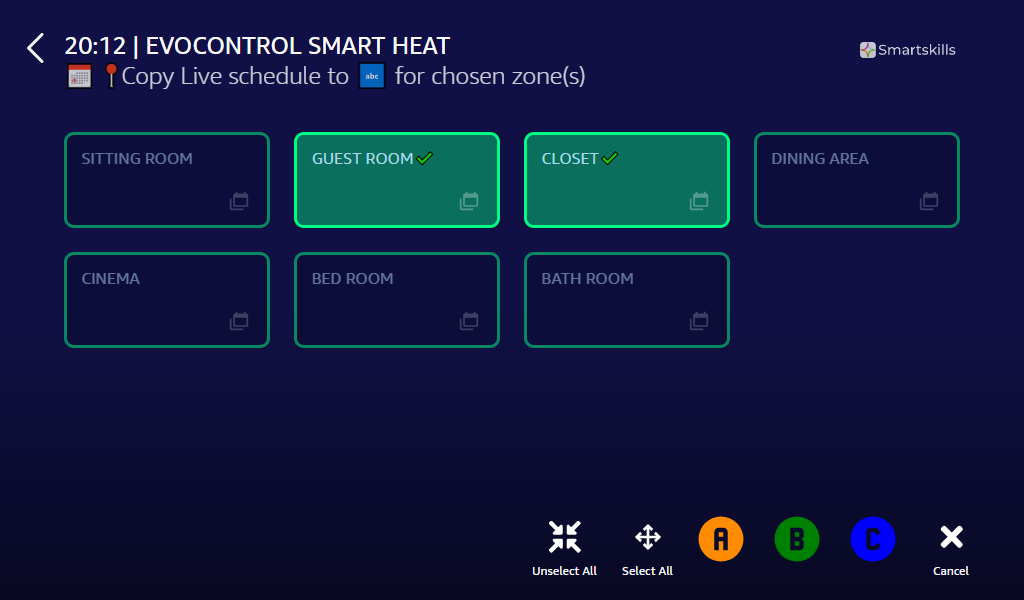
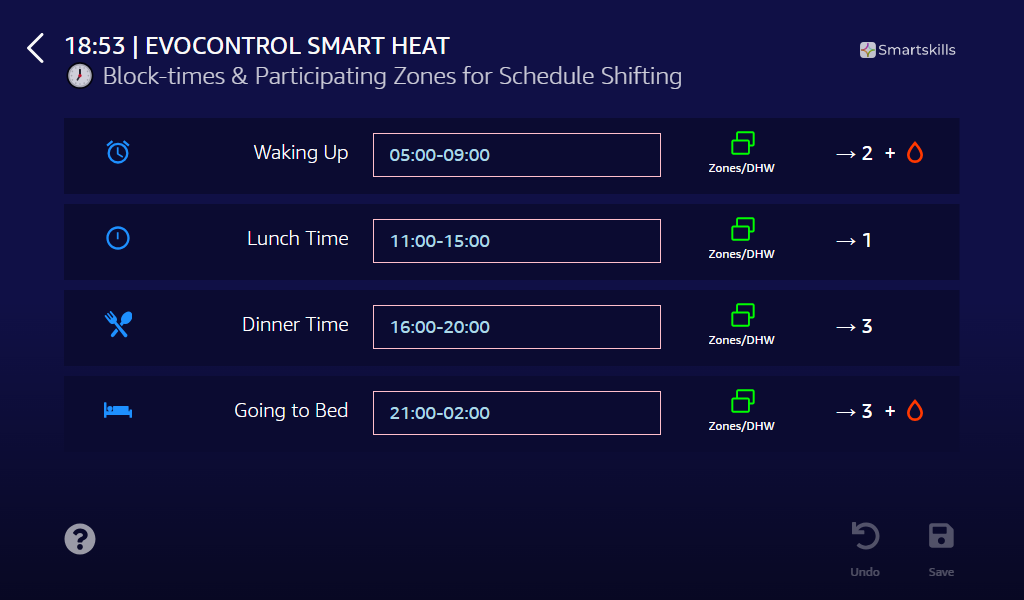
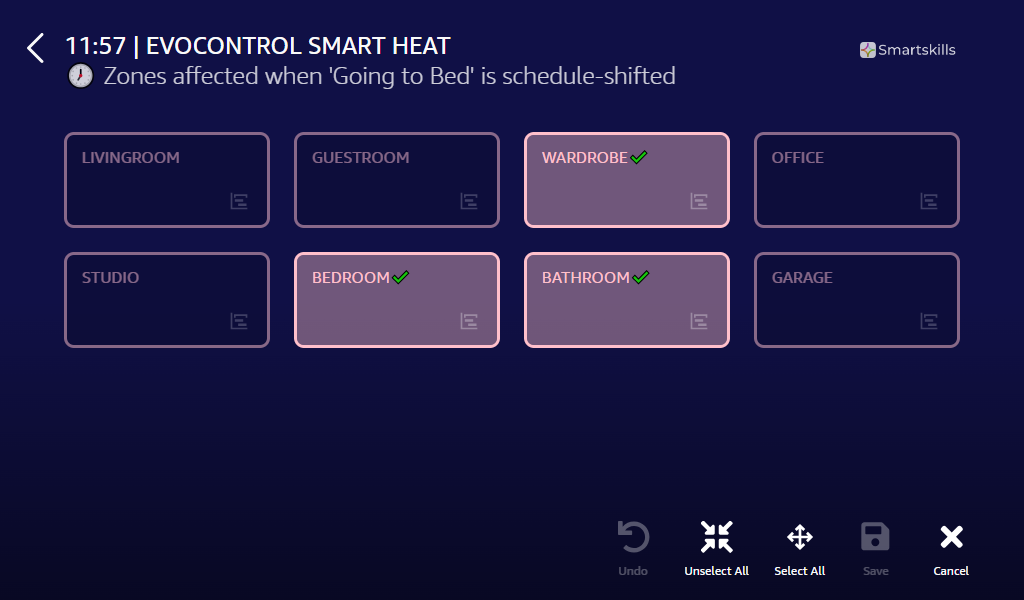
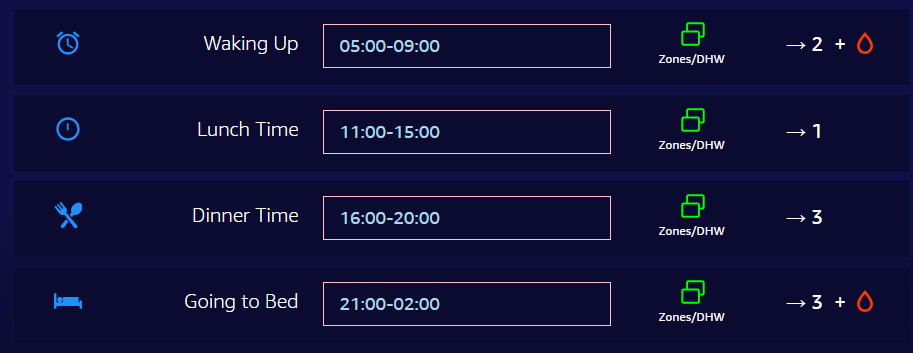
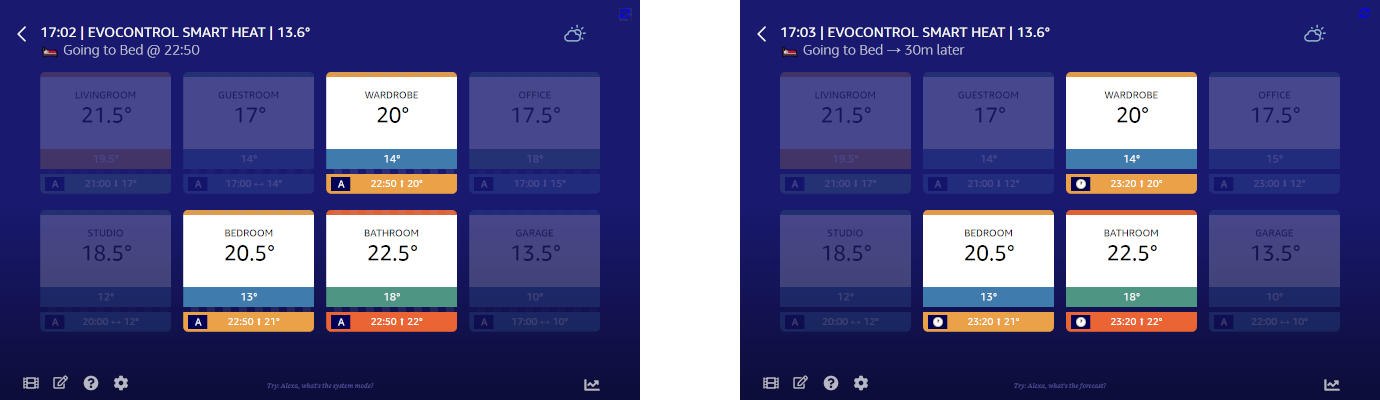
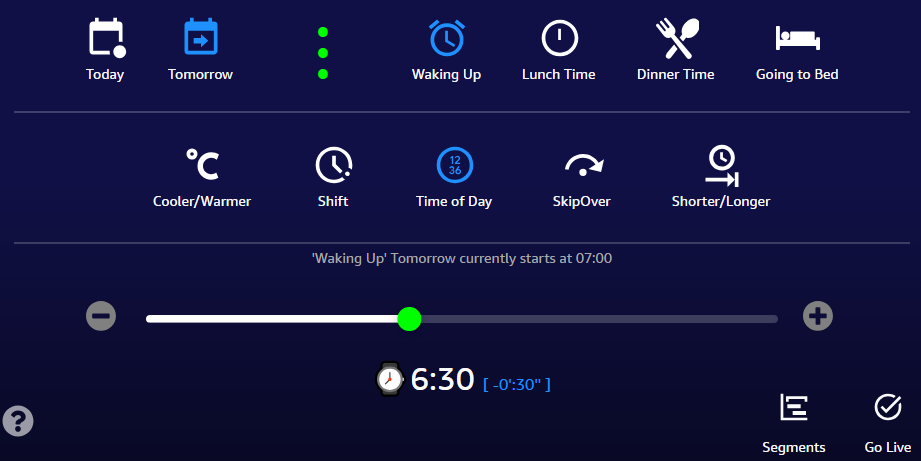

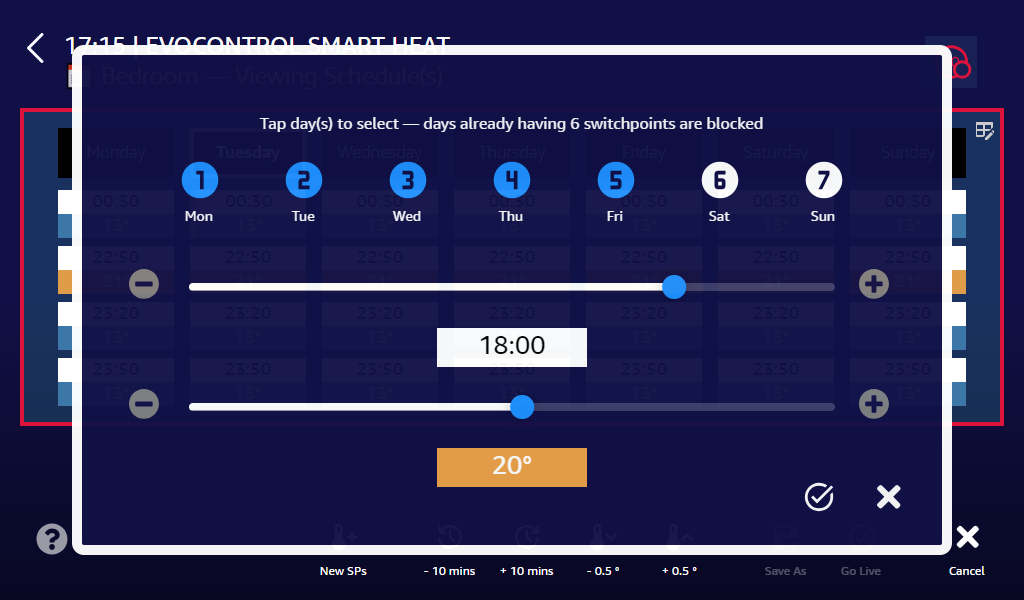
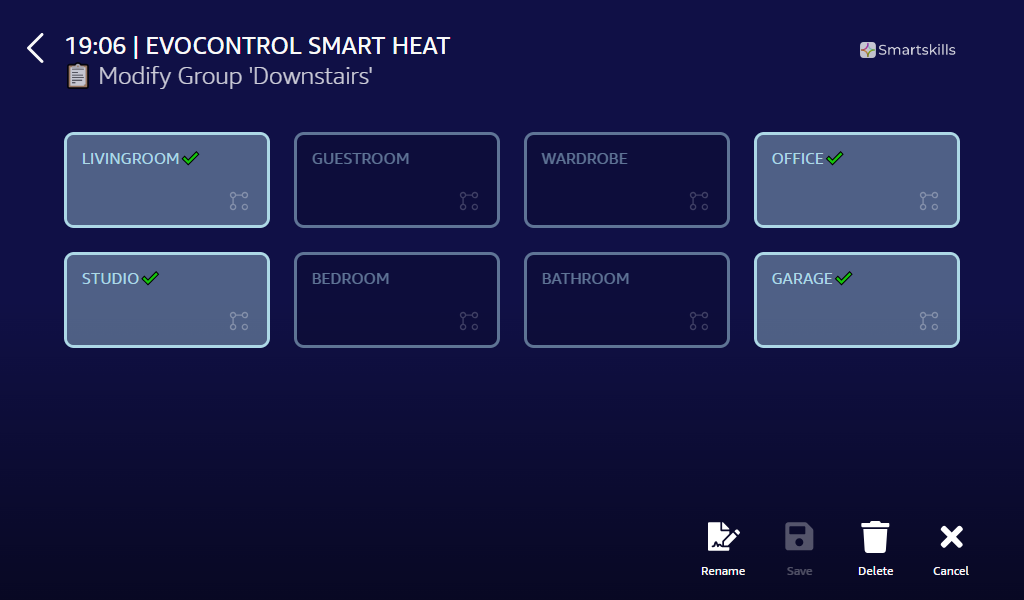
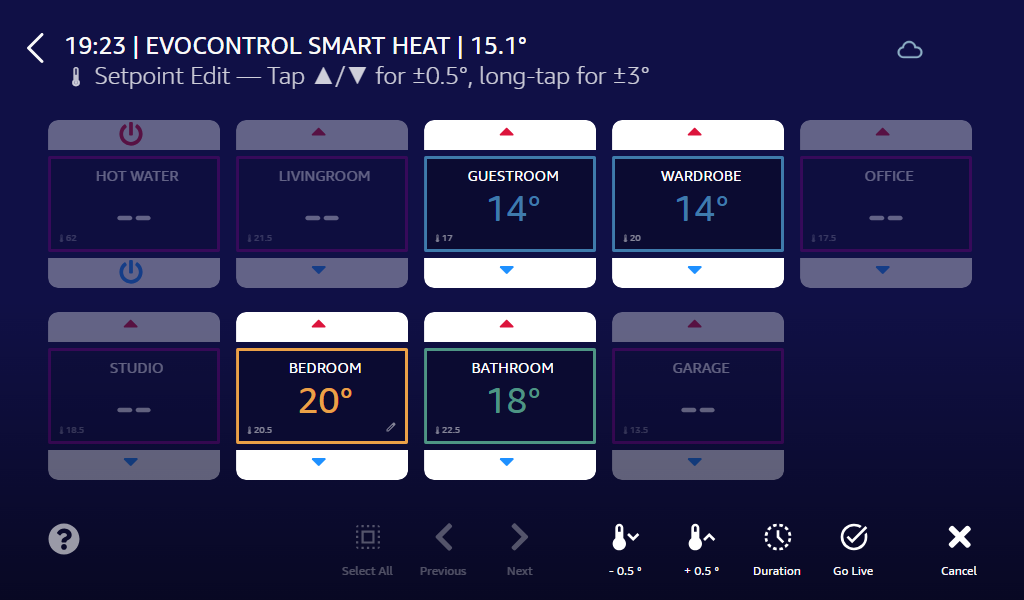
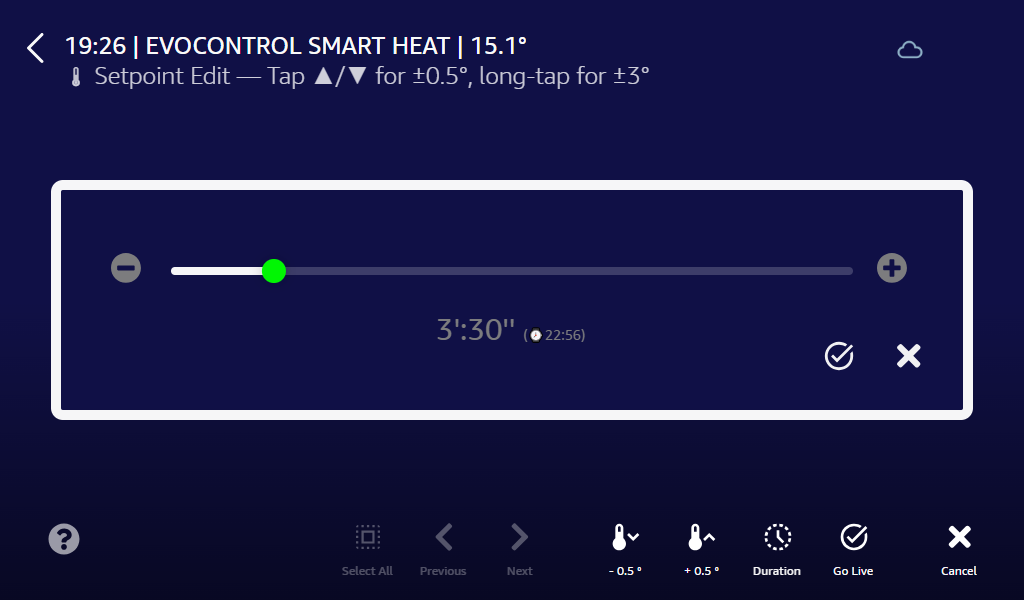
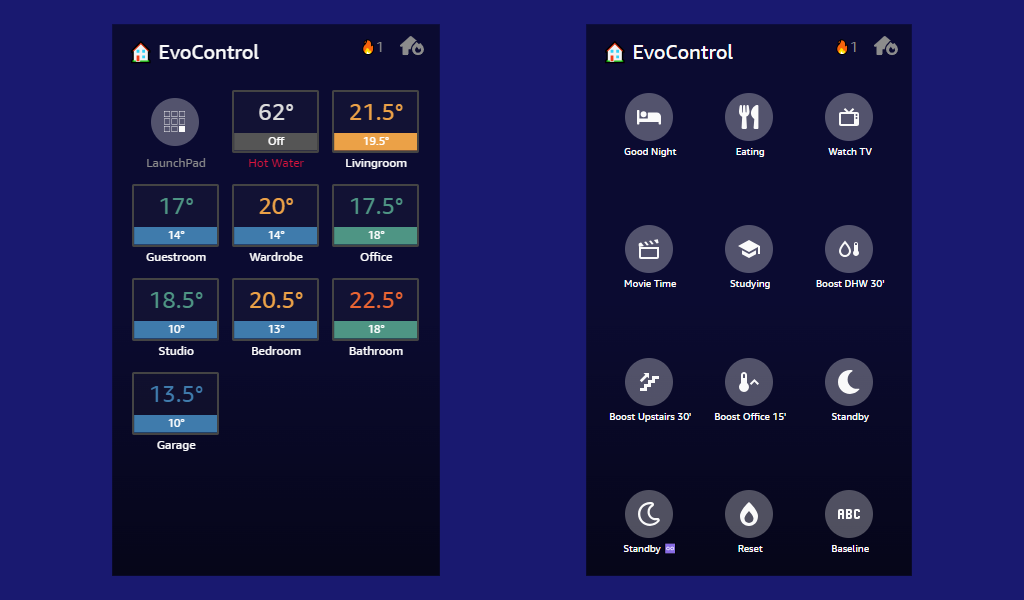
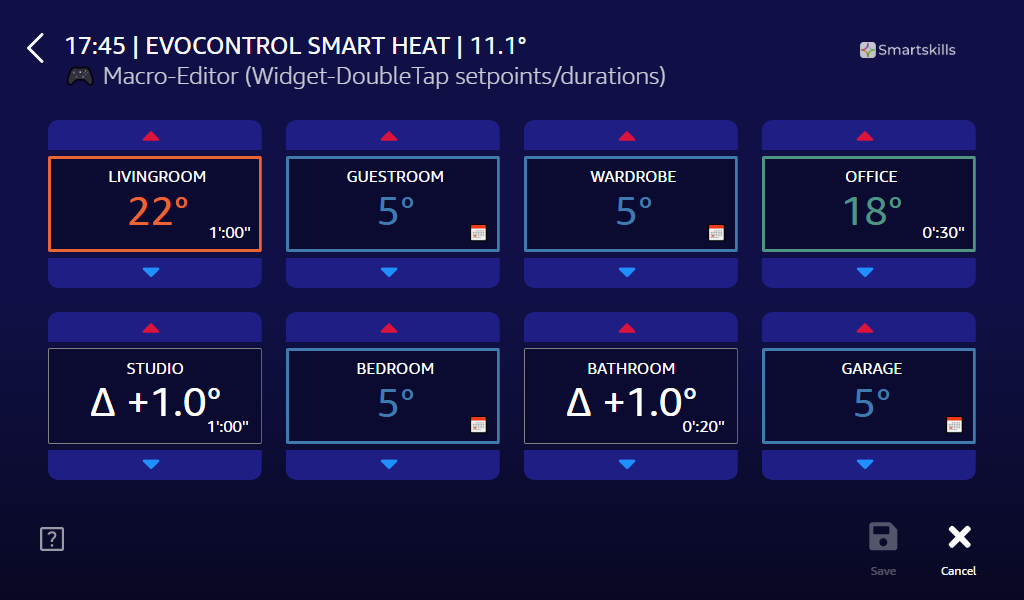
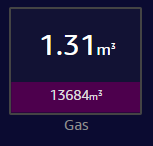
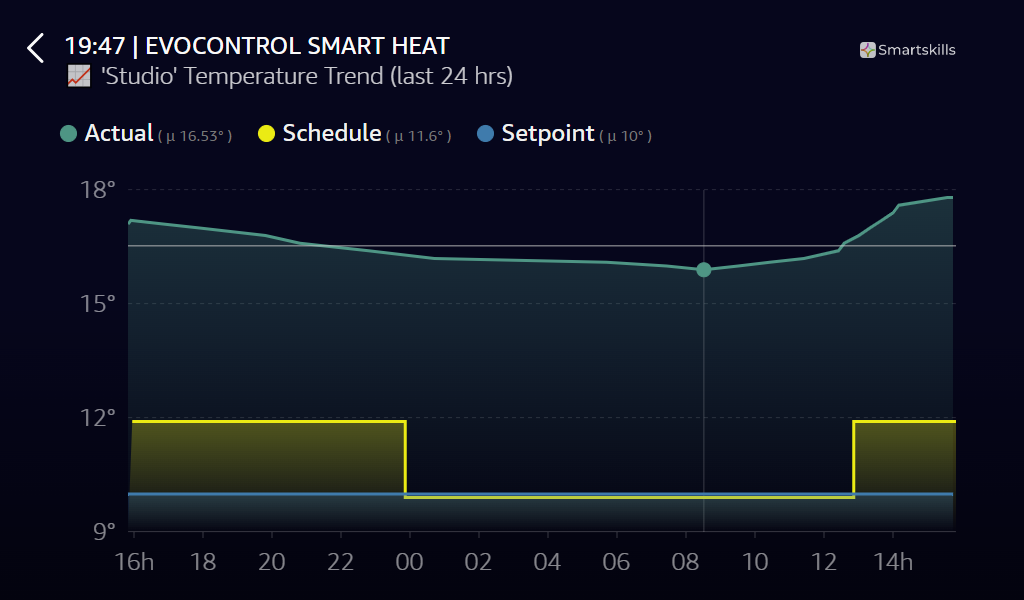
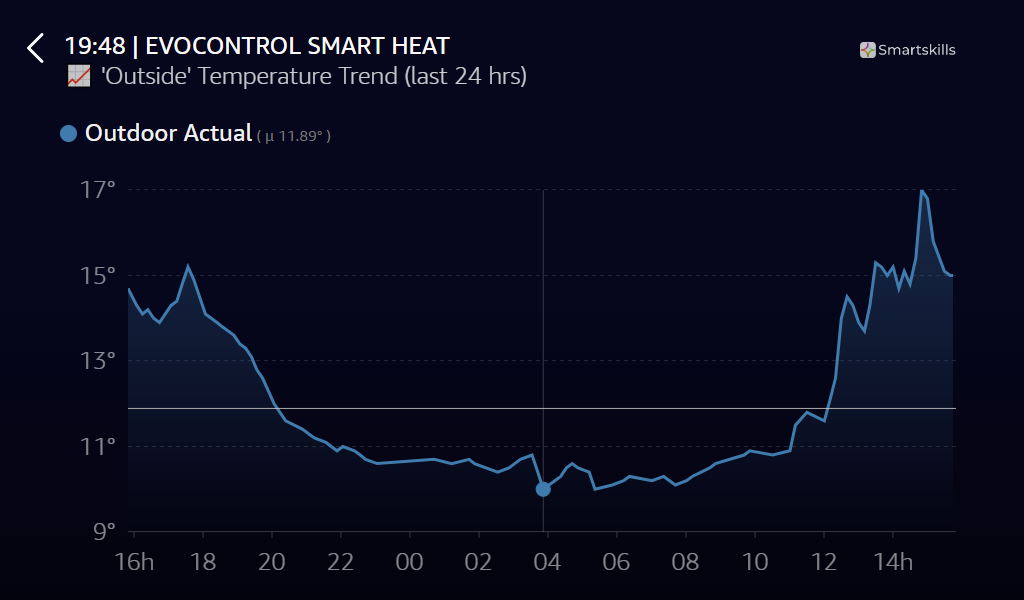
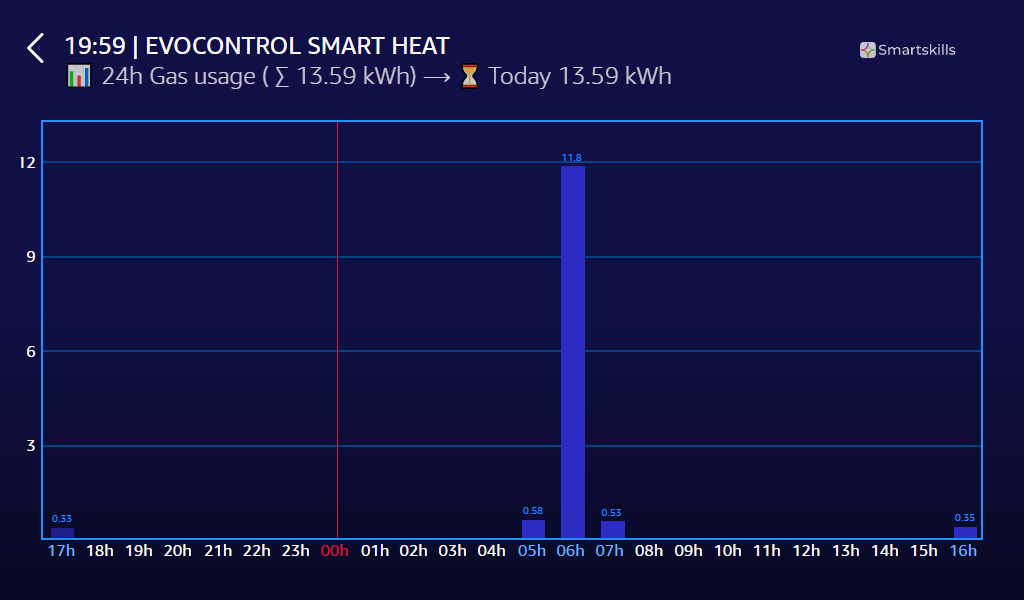

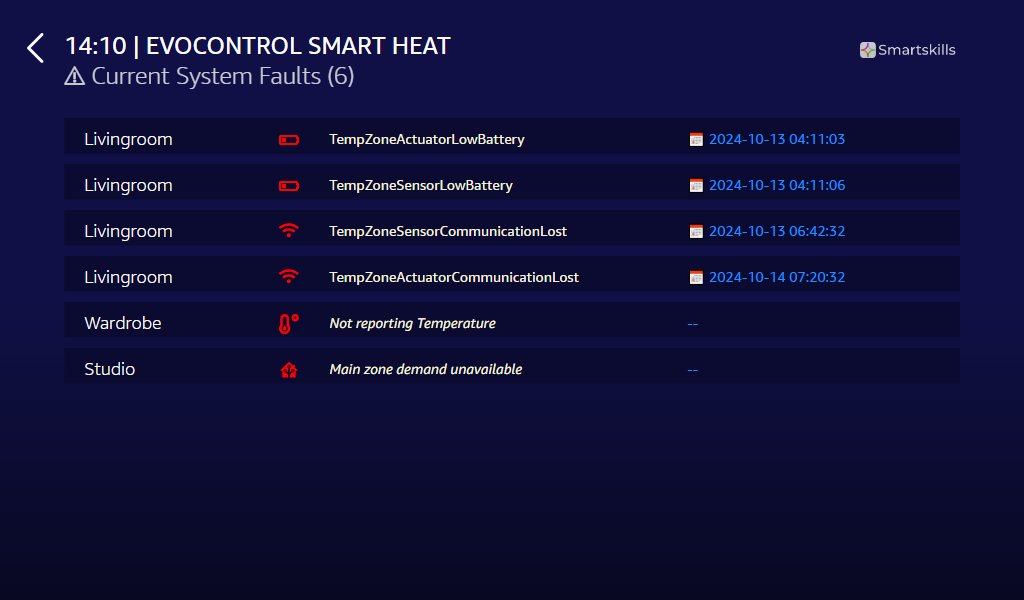
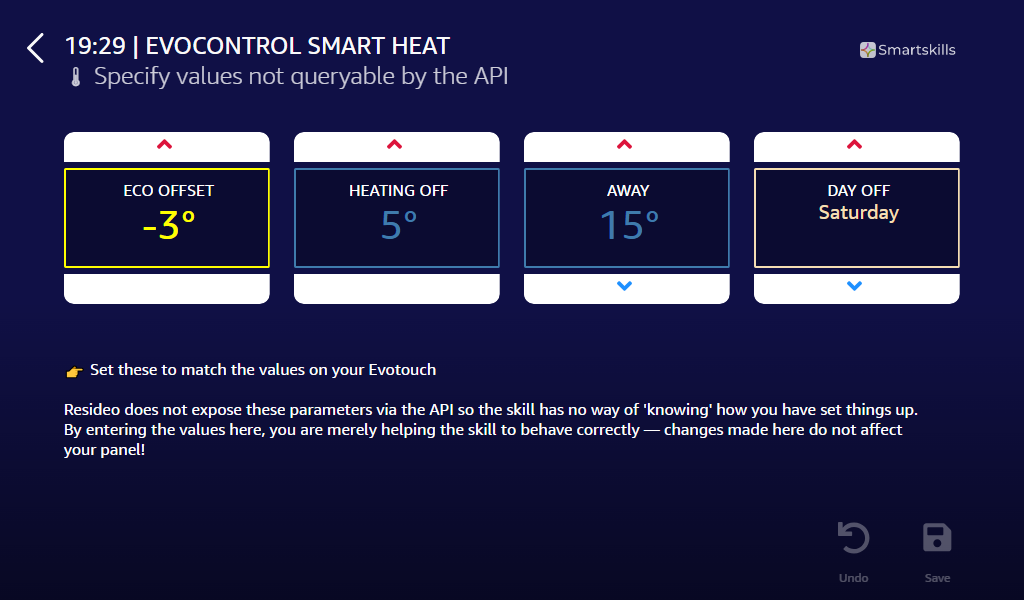
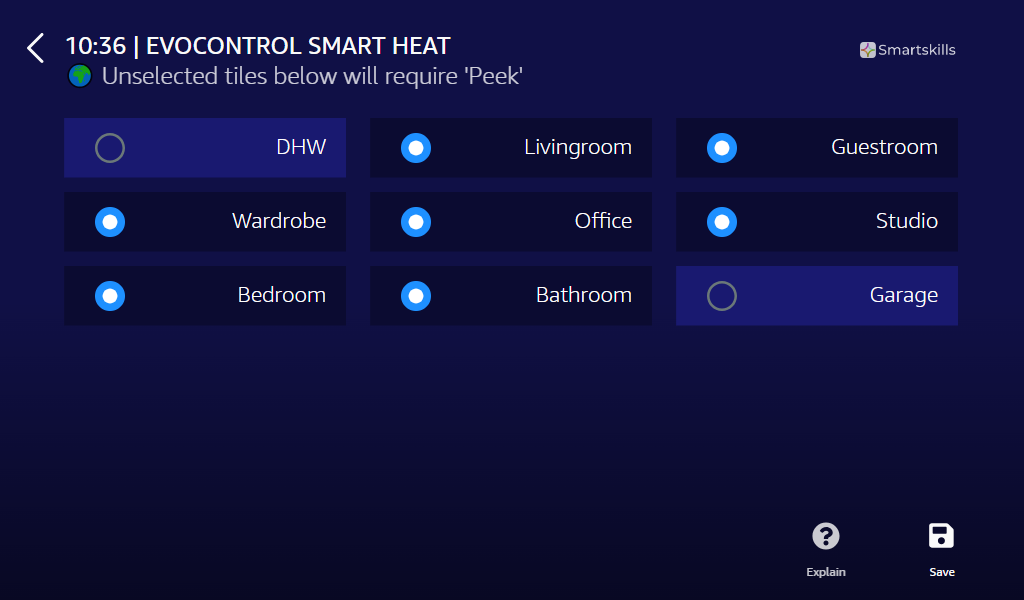
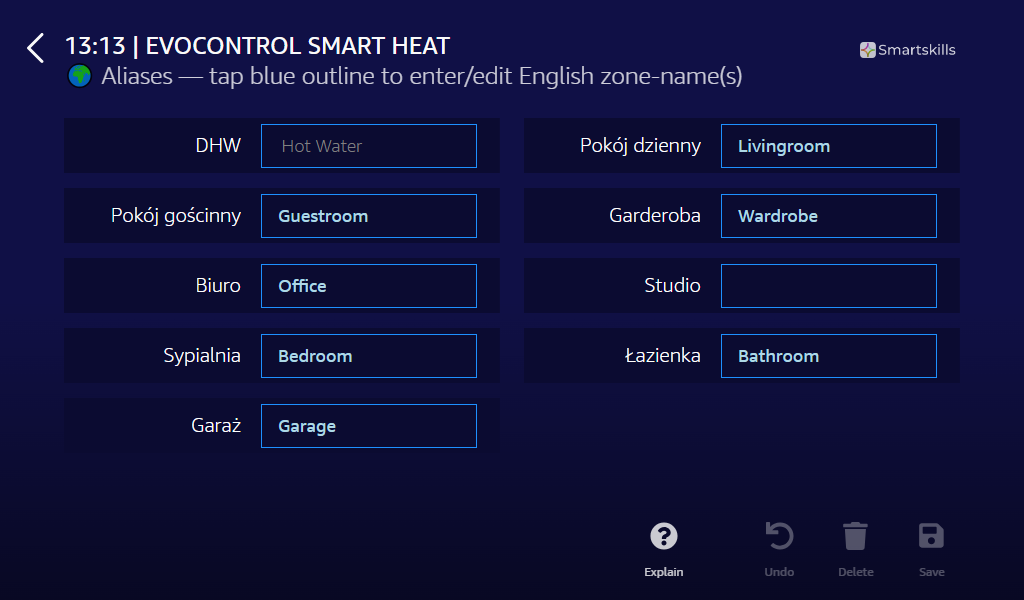
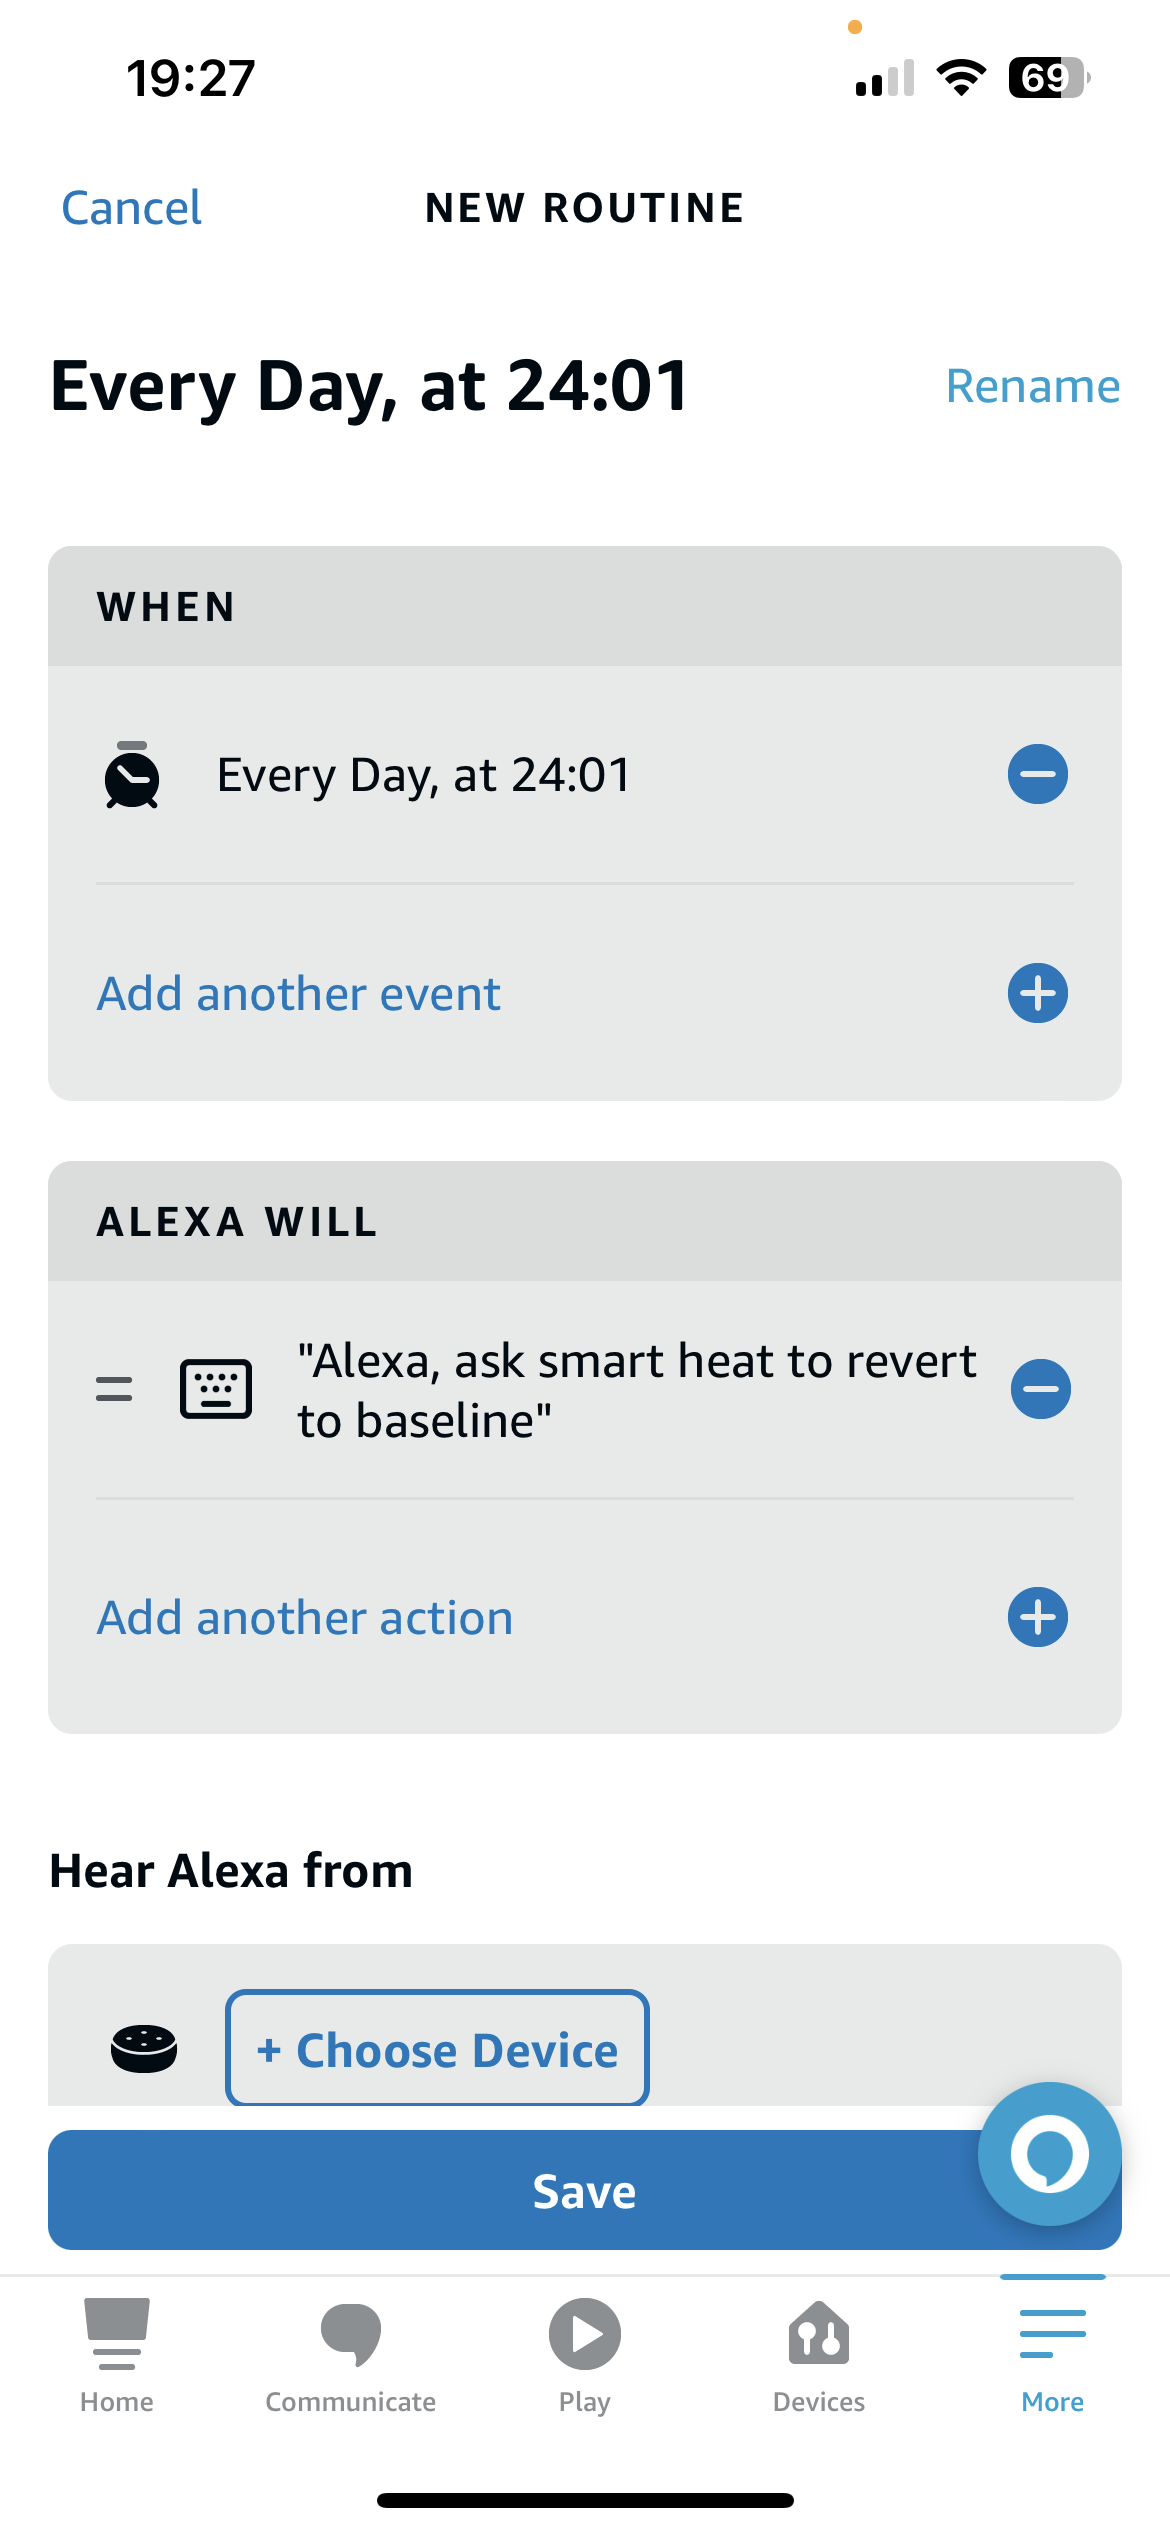 Just open the Alexa app
and go to routines. Then hit to create a new routine. Under
Just open the Alexa app
and go to routines. Then hit to create a new routine. Under